Bomberman Story
Field Zone


The game begins in the small town of Alpha. Here you will find a Bomb Shop; the Bomber Shuttle (where you can have your health refilled and a recap of the basic controls); and three houses - the top two have quests you can fulfil, while the bottom-left house contains a man who'll lecture you on everything Karabons.
In the middle house is Temmay, who wants a photo of Louie, while Honey resides in the one to the right, asking for her mother's ring to be returned. Both of those quests involve entering the L.Forest; since you can't go anywhere else yet, you've no choice in the matter.
Snapping the photo for Temmay will net you a Sensor, which you can use to make a Landmine in the Bomb Shop. Getting the ring for Honey will award you with a Small Medicine, and Pommy will join your side.
Now that you have your first Karabon, you can battle the kid blocking the exit. Karabon battles are never too difficult, and you can retry as many times as you want. Once he's defeated, you can proceed into the Plains.

[click to enlarge]
L.Forest is a small maze that is explored by teleporting through tree sutmps. It's nothing a bit of patience and exploration can't solve, but for the sake of convenience, I've colour-coded them in my map, and will refer to them when giving directions.
The only dangers to be wary of are the Balloms. You'll need to bomb the vines to get past them; don't stand in the way when they reconnect, or else you'll get hurt.
To reach Pommy and retrieve Honey's Ring, go: red, brown, and bomb the two vines trapping him.
To reach Louie, go: red, yellow, blue, green, purple. Walk to the top part of this area and Louie will emerge from the trees; you'll need Temmay's camera to actually accomplish anything with it, though. Having the camera will get you Louie's photograph.
When you have Elifan, revisit this area and enter the white stump. Using Elifan's pushing power on the yellow block to reveal a secret cave - inside is a man who'll award you with an extra heart to your life metre.

The Plains has nothing of interest.

[click to enlarge]
The ColdSea is a large place. There are a lot of Trents (killer trees) about, so be wary. You'll need to bomb the trees to create bridges out of them to get across the islands.
When you've got Sibaloon, revisit this area and use the bridge power to access the building in the top-centre, where you can recruit Firekong.

The only notable feature in ShuraRd is that you'll encounter Ceedrun here:

You'll have to complete a minigame to make it join your side: Ceedrun will shoot either up or down, and you have to predict in advance so you know where to block. It's very simple, and there's no consequence for failing. It'll always fire in the same place twice before changing, although it may shoot once at one place at the beginning and switch.
Once Ceedrun is beaten, it'll join you, granting you a shield ability, allowing you to travel up the road.

Upon arriving in Beta, a man named Ralph will drag you into his house and make you find the Radar in his basement. There's also a shop and a Karabon Coliseum.

B.Valley requires some switches to be pressed for platforms to rise, which have been colour-coded on my map. There's also an arcade in that cave entrance, where you can win Large Medicines for beating the high score, starting at 30.

More switches (still colour-coded!), slimes and Trents at MagBase. That building there is Magnet Bomber's base, and once it's finished, that gate will lower and allow you to access the Beach Zone.
MagBase (interior)
 [click here for a detailed map of the dungeon]
[C9] This here is the entrance, there are three Hige Hige Bandits, but you can ignore them and head for the exit if you want.
[B9] This room, however, requires three snakes to be cleared out before moving on.
[B8] Explode the Hige Hige Bandit and use Ceedrun's shield to protect from the arrows.
[B7] This holds the Yellow Crystal, as well as two bullet statues. There's a hidden doorway at the right.
[C7] Here there are three snakes and three blocks; destroy the former, move the latter with Elifan and get the Large Medicine.
[B6] There are four Zombies to return to their grave before you can move on.
[C6] Use Ceedrun to shield yourself from the arrows.
[C5] Get Elifan from Bibidi.
[A6] With Elifan, move the block to open the door.
[A5] The red block unlocks B5, the blue unlocks A6 and A4.
[B5] Avoid the bullet statue.
[A4] Or you can avoid/shield some arrows.
[B4] Four hedgehogs to dispose of before you can move on. A nice time to test your landmines.
[B3] More blocks. Yellow opens B2, green opens A3, blue opens B4, and red opens C3.
[A3] Get the FireUp in the chest.
[C3] Remove the Hige Hige Bandit and move the blocks out of the way.
[C4] Go down the stairs to reach SID, where you'll get P.Fangs.
[B2] Dispose of the two snakes and two hedgehogs.
[A2] Use Ceedrun to protect yourself from the arrows, and get the Silver Shoes in the chest.
[B1] Use P.Fangs to open the door.
[B0] Magnet Bomber! He'll transform into MagnetDragon, and lock the doors. They'll unlock after he's defeated.
[A0] Max left a hologram for you, where he'll give you the Medal of Bravery, as well as an extra heart to your life metre.

[click to enlarge]
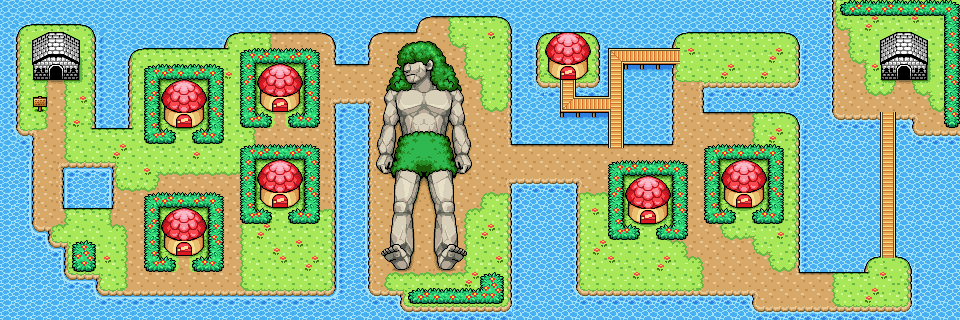
Omega is accessed via a cave in the Desert Zone, and doesn't appear on the map. There are two things to do here: give Morg the giant your Teriyaki beef to access the right half of the area, and retrieve Unagi in the grey building on the far right.
| RETURN TO GAME INDEX |
RETURN TO MASTER GAME LIST |
RETURN TO HOME PAGE |
| page last modified: 09/01/2012 | ||