Bomberman Story
Desert Zone

Faster Drops! Aside from that, nothing to see in MtRoad. Move on.

When Zeta is first entered, it's in the middle of a sand storm, preventing you from going anywhere. Use Youno to calm the storm, though there's still a danger of falling, flaming rocks from the sky.
In the second-from-the-right house on top is Tekuji, who gives you the StepCount. Walk 100 steps and return it to him, and you will receive Sibaloon.
There is also a Karabon coliseum.

SararMts has three caves: The lower cave will take you out of the top-right cave. The top-left cave houses a girl who will refill your health.

OldBase's top cave takes you out of the bottom cave: you can reach ground level by going right and taking the staircase in SararMts, and walking right again.
The base contains P.Animal, who's in need of rescue. Time for another mini-game!

If you've played the Spark Bomber mini-game from Bomberman World, you'll be familiar with this. The path of Hige Hige Bandits bobs up and down, and touching them will throw you back to the overworld. Traverse it successfully and P.Animal is yours!
Push the blocks and leave through the bottom of the base.

Quiksand's sands will move you in whatever direction they're facing. There's nothing of note here.

Buy the Teriyaki Beef in the Shop. Once you have Karabon Unagi, return here and stand on the altar to unearth GlmBase at the top right of Volcano.
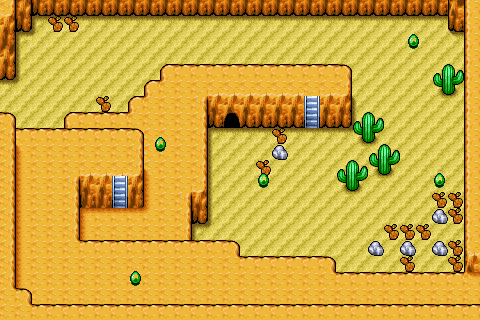
Desert is a large map, and has several important objectives.
The bottom-left cave will take you to Omega, back in the Field Zone; take the Teriyaki Beef with you. The cave next to this one has a kid who will give you a Large Medicine.
After Golem Bomber is defeated, the staircase in the lower-right will be unearthed and will lead you to Theta - your first step towards reaching Fantasy.
Also after Golem Bomber is defeated, a "Phantom Oasis" will begin appearing on this map randomly. It may take several attempts to find, but entering it will net you Elekong.

LavaPool is little more than a maze of platforms for you to test Sibaloon out on.
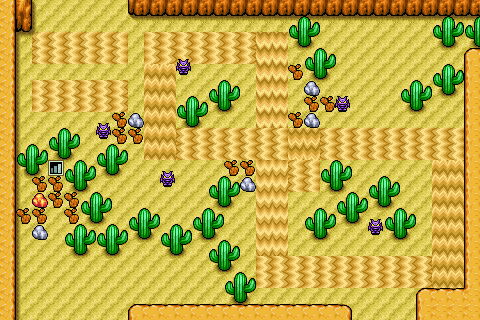
Volcano is a massive map, filled with lava, raining rocks, and trenches that will periodically fill up with lava. Be on your guard.
There are a lot of caves on this screen; the caves I have marked blue and green lead to each other; the path between them is what you'll want to follow to reach GlmBase at the top-right. Be aware that unless you have taken Unagi to Ita, GlmBase will not appear.
The cave below the lower blue cave has a girl who, if you give her Teriyaki Beef, will add an extra heart to your metre. Also to be found are two Shops and an Arcade (with a base score of 60).
GlmBase is found in the top-right of Volcano. No point splitting up the map image for an area that offers nothing outside!
GlmBase (interior, floor 1)
[C4]The entrance to GlmBase. Take a left.
[B4] Use Ceedrun to protect yourself from the bullets while waiting for the flames to retract.
[A4] Be careful of the landmines and get the Blue Crystal. The furnace does nothing.
[D4] Take out the four Mummies to open the doors.
[E4] Watch out for the flame spurters.
[E3] Keep an eye out for landmines.
[E2] Use Sibaloon to cross those gaps. There are landmines and fireballs to look out for.
[E1] Destroy the two Clouds to open the doors.
[E0] More flame spurters and fireballs to be careful of.
[D0] Even more flame spurters. Down those stairs is SID, where you'll get SeaWing after getting Youni in C1 above.
[D1] Be wary of the landmines and move the block to reach D1 of the second floor.
[D3] Down those stairs from D3 of above, blast the switch to open the left door, while the top wall can be blown up.
[D2] Get the Small Medicine in the chest past those flame spurters.
[C3] Just some landmines.
[B3] Swat the three Saspiders to open the doors. Blast that top wall.
[B2] Coming there from B3 will only let you disable the spikes, but returning from A2 will let you get the Gold Armour.
[A3] Bomb that switch and use Sibaloon to cross the gap.
[A2] Push the blocks and bomb the right wall, but don't push the middle blocks first.
[A1] Throw a bomb at that switch from the side.
[A0] Wipe out the three Mummies and two Clouds to open the door.
[B0] Use Sibaloon to cross the gaps. More fireballs to evade.
[B1] Use Sharkun to make that staircase appear.
[C2] Use SeaWing to open the door.
[C1] Golem Bomber! Kick his ass to open the door.
[C0] Max left yet another hologram for you, with the Medal of Friendship, another heart, and opened up a new path in Desert.
GlmBase (interior, floor 2)
[D1] More landmines. Blast open that top wall.
[D0] This room introduces trap floors will warp you back to the entrance if you fall through them. Follow the path in the detailed map and get the BombUp.
[D2] Dispose of the five Sandes to open the doors.
[D3] Those stairs lead back down to the first floor. More landmines. Blast that right wall.
[E3] Watch out for landmines and trap floors. There's a Large Medicine in the chest.
[B1] Following the staircase from B1 below, push aside the blocks and bomb that left wall.
[A1] More landmines and a trap floor! Getting through them will reward you with a Small Medicine.
[C1] Rao will give you Youni. Now you'll have to backtrack to D0 of the first floor to fuse him with Unagi.
[B2] A room full of those frigging trap floors. Work a way through them using the detailed map.
[B3] Three Sandes and a Saspider need clearing out to open the doors. Blast that bottom wall.
[B4] Get past the flame spurters to reach a Large Medicine.
[C3] Trap floors and flame spurters.
[C2] Walk off that ledge to fall to the lower floor; you'll land outside Golem Bomber's chamber.
| RETURN TO GAME INDEX |
RETURN TO MASTER GAME LIST |
RETURN TO HOME PAGE |
| page last modified: 18/05/2012 | ||


