Bomberman Quest
Beach Zone
Click a square of the map to leap to its description. |
cavern 1
cavern 2 cavern 3 dungeon |
F5 |
G5 |
H5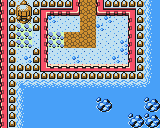 |
E6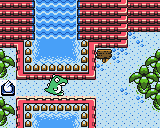 |
F6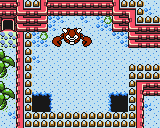 |
G6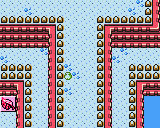 |
H6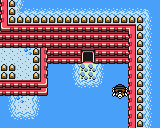 | |
E7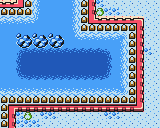 |
F7 |
G7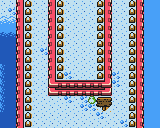 |
H7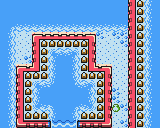 | |
E8 |
F8 |
G8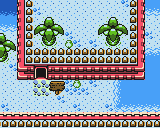 |
H8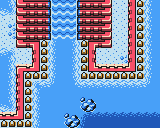 |
F5
The entrance to Beach Zone; go left to return to Peace Town, or up to return to Forest Zone. You can access cavern 1 in the bottom-left.
Defeat Gargoyle to obtain the Helmet.
G5
Defeat Gell to obtain the Boomerang.
G6
If you enter from F6, you can dig in the bottom-left to obtain a Poison Ivy.
G7
To follow the main path, jump to the lower platform and go up the righthand side (leading to H6). To obtain the Aqua Bomb, go up the lefthand side (to F6).
F6
If you entered from G6, defeat Kani Bubbler / Krabbler to obtain the Aqua Bomb.
If you entered from E6, you can enter Hurricane Commander's lair.
H6
To follow the main path, continue down. You can access cavern 2 from here.
Defeat Despider to obtain the Hammer.
H7
To follow the main path, go down the left path (to G8). If you have the Glasses, go down the right path (to H8).
H8
Use the Glasses to reveal and obtain the Gold Armor.
G8
Continue left. You can enter cavern 3 from here.
F8
Defeat Iceal to obtain the Ice Shard.
E8
Defeat Puuyan to obtain a Fire up.
E7
To follow the main path, continue up. If you have the Teleport Armor, enter the water on the left and use the Scoop / Shovel to obtain a Boomerang.
F7
The treasure chest on the island contains a Full Heart; to reach it without taking damage, use the Scuba Gear or the Wings.
E6
Go right to reach Hurricane Commander's lair. Defeat Dragon Pup to obtain the Full Fire.
Once Hurricane Commander is defeated, going left will lead to Peace Town.
H5This self-contained area can only be accessed from the Forest Zone using the Wings. Use the !? item in front of the statue to obtain the Teleport Armor. |  |
|
Accessed from F5. To access the treasure chest, you need to throw a Speed Bomb (using the Power Glove, natch) at the switches on the far-right. Inside you'll obtain the Lamp. | 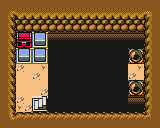 |
|
Screen 1: Accessed from H6. Strike the post with the Tackle Belt to lower the barrier. Use the Tackle Belt again to cross the collapsing tiles.
| 4 |  |
|
| 3 |  |
2 |  |
| 1 |  |
| 3 |  |
||
| 1 |  |
1 |  |
Screen 1: Accessed from G8. This entire cave is in darkness, and features numerous traps; equipping the Lamp is recommended. Jump the gap using the Jump Shoes, and jump your way to the doorway; there are invisible landmines underfoot!
Screen 2: Cross the collapsing tiles with the Jump Shoes, Dash Shoes or Tackle Belt. You must blast all four switches at once to lower the blocks in Screen 3.
Screen 3: Defeat Seeballon to obtain a Clock. You must blast the switches in Screen 2 to be able to reach Seeballon.
1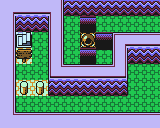 |
2 |
||
6 |
5 |
4 |
3 |
7 |
8 |
9 |
Screen 1: Accessed from F6. Pound the posts with the Hammer to enter the dungeon. When entering to the top from Screen 2, blast the switch to lower the top blocks in Screen 2.
Screen 2: Go up and around to Screen 1; use the Shield or Jump Shoes to avoid the arrows. With the top blocks lowered, blast the switch to lower the bottom blocks.
Screen 3: Use the Jump Shoes to get around the holes in the floor. Defeat Skullhead to obtain the Armored Jacket.
Screen 4: Use the Push Bracelet to move the rocks; from the right, push the second and fourth rocks up, and then top-right rock forward. Walk to the bottom and push the lowest rock forward, and the one above it upward.
Screen 5: Use the Jump Shoes to get past the spikes. A crossroads; go down (to Screen 8) to fight Hurricane Commander, or go left (to Screen 6) but only if you have the Wings. Defeat Pinokion to obtain the Homing Bomb.
Screen 6: There are three swinging balls to avoid; they all move at the same speed, so timing your move shouldn't be too troublesome.
Screen 7: Use the Wings to cross the gap and obtain the Remote Control.
Screen 8: Cross the gaps with the Jump Shoes. There are falling rocks here; don the Helmet to avoid potential damage.
Screen 9: The boss room! Defeat Hurricane Commander to obtain an Explosive Core, an extra unit of health and a shuttle part!
Once the Desert Zone is complete, return to Screen 9 to fight Deral for another extra unit of health.
| RETURN TO GAME INDEX |
RETURN TO MASTER GAME LIST |
RETURN TO HOME PAGE |
| page last modified: 11/12/2017 | ||