
Mission 4
This walkthrough is written by Rage Quitter 87.
This mission starts out at a beach with lots of rocky platforms. In the first part beware of the sea, if you fall in you will die. Parts 2 and 3 are full of enemies and can be tricky to get through without dying. This is the only mission without any secret areas or alternative routes.
Part 1 - Beach

===CLICK FOR BIG===
[1] You will parachute down at the start of this mission, and you'll see two enemy soldiers talking to each other. They won't notice you as you drop in and you can kill them before they even have the chance to see you. After killing them, stand at the first barrel you see and jump upward whilst shooting down to reveal a hidden fish.
 Go right and you will see another barrel. Repeat what you did for the fish to get an Enemy Chaser. Continue right and you'll see some funny rock formation things, stand underneath the second one, aim up and shoot and Card 005 Type-R will drop down. Keep going right and the screen will lock.
[2] At this point, enemy troops will parachute down, but with the Enemy Chaser they will all be killed pretty quickly. After they are all dead the screen will unlock. Free prisoner (046) to be given a rather nice Shotgun. Continue right and you'll have some rocky platforms to jump. When you leap onto the second one the screen will lock again, and you'll have to face two small enemy helicopters before you can proceed, but with the Shotgun these machines are very easy to beat.
Once they have been destroyed the screen will unlock, so go right and jump up the small three steps, then fall off the little ledge and shoot the left corner for another fish. You will see a rocket launcher enemy and a tied up prisoner on the next platform. When the enemy fires off a shot, jump across and kill him with your shotgun, and the blast will probably free the prisoner. This is prisoner (047) and he will give you Card 010 L.S. Clip.

[3] Jump across the platforms as you make your way right. Watch out for a couple of divers who will throw missiles at you if you don't kill them fast enough. Jump across another platform to see prisoner (048) tied up, free him to get Card 014 E.C. Clip.
[4] You'll now have to jump across a few more platforms, some of which are the same as the ones you had to fight the two small enemy helicopters on earlier. There are a few well placed enemies who can hit you as you jump around and this can be fatal so be careful when getting through this section. Once you have gotten through, move right to finish this part.
Part 2 - Mountainside

===CLICK FOR BIG===
[1] As soon as this part starts, a spiked enemy tank will roll on. You should still have the Shotgun at this point so this enemy machine should be very easy to destroy, a couple of blasts will total it. Continue right and you'll see an enemy soldier on a platform, kill him.
 You then need to make a jump across. This jump is VERY difficult to pull off, so expect to die a fair few times at this part of the mission. If you simply cannot make it, read [2] for a simpler method, albeit with a sacrifice.
Once you do make it, fall down to the box below you and break it for a Shotgun. From here keep going right shooting enemies as they appear and then prisoner (049) will give you some bread. Now go to the left until you see a platform you can jump up. Do so, then head right climbing a set of stairs, and you will see prisoner (050) who has Card 022 Shotgun+. Once he is saved, head all the way back, jump over the gap that was so hard to get across before, then go left to where you faced the spiked tank, and head up a couple of platforms and go right, climbing a set of stairs.
[2] On a platform above the top of these stairs is prisoner (052), a Shotgun blast will free him and he will walk to the right then drop down. When you save him he'll give you a Laser Shot. Then head right up another large flight of stairs.
NOTE: If you don't go and rescue prisoners (049) and (050), there will be a Slug available to you at the top of the stairs where prisoner (052) is near. The Slug makes this section a lot easier but you can only use it in this part of the entire mission. Alternately, going up the stairs first once you enter this area, you can take the Slug back down to the difficult gap, take it to the very edge and then leap out of it. You'll cross the gap for certain, although you won't be able to use the Slug for the rest of the area.
 [3] Anyway, at the top of the large flight of stairs, jump left to a platform where you can see a box. Inside the box is the Card 025 E.Chaser+. From here jump up another couple of platforms and head left. A few enemies will pop out of the square black holes in the background, shoot them before they have the chance to see you. When you reach the end of the platform you are on, stand at the very tip of it then jump left and shoot and you will free prisoner (054) who has Card 028 Super TNT. When you do so you will drop down between a couple of rocket launcher carrying enemies and a rolling bomb throwing soldier. You will have to have good reactions to survive this part without taking a hit. Once these three enemies have all been killed, head left down some stairs and keep going left.
You will see a homing missile launcher and a few enemy soldiers, kill them and head left to see prisoner (051), free him to receive a Rocket Launcher. Jump up a few platforms and head right up some stairs. When you are about a quarter of the way up these stairs, jump left and shoot upwards to free prisoner (053) who has a banana for you. Now continue up the stairs all the way killing enemies as you go, then the ground will level out, continue right and then you will have to go up another set of stairs, once you are at the top of this set go right and you'll see a box, open it up to get Card 029 Army Knife. Go right and you will go onto the next part of the mission.
Part 3 - Elevator central

===CLICK FOR BIG===
 [1] Go right here and watch out for enemies who pop out at you. The fifth black square in the background you see has Card 034 L.3 Armor in it, shoot at the square to make the card drop. Jump across to the garage door you see and shoot above it, prisoner (057) will drop down and he has Card 072 Eri. After getting this card, go to the elevator and let it take you up so you can proceed right, go right and you will see a orange soldier who will leap at you, so be careful. Once he is out of the way, go a bit more right and you will see a firework throwing soldier in front of a garage door, jump down to him and kill him then aim above the garage door and shoot to get prisoner (060) who will give you some bananas.
Go left and fall down, do NOT take the lift. You should hold left or you will fall down a pit. An enemy tank should be to the right of you. Keep going left until you get to a garage door, shoot above it to free prisoner (058) who has some bread for you. If you don't have much health left, go all the way to the left to see a box, break it for a turkey. Now go all the way to the right to where the enemy tank and pit was. The pit will now be gone and there is a lift there which will take you back up. Shoot the tank from long range then take the lift up. Let it take you all the way up until it stops. Go right to a garage door, shoot above it to get Card 076 Hyakutaro. Now jump across left and go left and keep going left until you get to another garage door, shoot above it a lot to get a treasure box to fall on you. Go left from here to another garage door, shoot above it to free prisoner (056) who will give you some canned food.

[2] Go right from here to the lift and let it take you up all the way, then when it stops go left and shoot above the garage door to free prisoner (059) who will give you an Iron Lizard. From here go right and jump the gap and keep going right until you se another lift and a tank. Stand on the lift and throw grenades to destroy the tank, then let the lift take you up.
Then go right again and you will see another lift, let that you all the way up then go left and jump across the first pit you see to another garage door. Shoot above this to get grenades. Go left and jump across to another section and shoot at the first black square you see to free prisoner (055) to get a Flame Shot. Go all the way back to where I said go left first, but go right now. At the first black window you see, shoot at it to get some bread to drop down. Shoot the third window to get some canned food. Now go right up a small flight of steps and keep going right to end this part of the mission.
Part 4 - Boss

Keesi III is the boss of this mission and it is a rather large bomber plane. When it first appears it will start firing bullets at you from the two small guns it has. After a few shots from these it will lower down and let a few soldiers out. When these appear, try to kill them before they hit the ground. Always watch out for a yellow coloured one - when he is killed he will drop an Enemy Chaser for you.
Once you do enough damage and flames start appearing everywhere on it, it will change tactics. It will fire lots of bullets and then open up it's front revealing a large missile. It will try to slam the missile on you, so just carefully try to move out of it's way before it shoots the missile at you.
 Another tactic this boss has is to move off screen then sweep from the left to the right of the screen or vice versa firing lots of bullets, they can be avoided but expect to take a hit here. One final other tactic this boss has is to use the missile again, but before it drops the missile it will fly upward off screen and then rush downward, just run from one side of the screen to the other to avoid this attack. Keep shooting it and this boss will blow up and crash.
To destroy this boss quickly, get the flame shot from the previous section, and be sure to have Cards 012 F.S. Clip and 023 F.Shot+, plus a lot of grenades. As soon as the boss battle starts, use the flame shot until all of it's ammo is gone then throw grenades until you run out of those. The only thing you can do after this is to blast it with your hand gun (make sure to have auto fire on) or use the S.S.Sword (having Card 030 Demon God will help a lot) and this boss should soon be destroyed.
prototype
Click maps to enlarge them.


The stall point with the Masknell doesn't appear to work in the prototype; it'll stall briefly, but the enemy won't load so it resumes.
The rock platforms at the end of area 1 have been partially restructured, and with less enemy diversity; there's not as many frogmen, and there's no openings for bazooka soldiers to appear from inside the rock structures.
The water is one of the few background elements in the prototype that animates, though it animates a little too fast.


The prototype has gaps in the walkway filled with girders. This is purely aesthetic and makes no difference to the level geometry; the gaps were plugged in for the final.
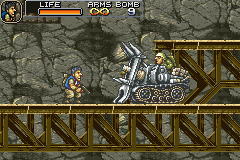

The Melty Honey stops closer to the player in the prototype; an extremely banal thing to mention, if its position didn't make it extremely difficult to bypass or lob a grenade onto. Its spike barrier has no collision detection yet though, so it can be bounced over harmlessly.
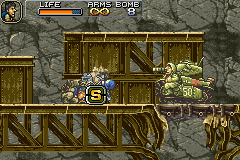
On the lower-right platform, the box containing the Shotgun is under a crawlspace. The final changed this to a regular two-tier platform structure, and added a gap at the far corner.
The passage to the Slug Mariner is still intact, with a darker backdrop to allude to it going to a different part of the base.
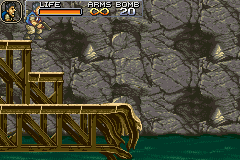

The background tiles are all that's changed about the Slug Mariner dock.
The undersea path is identical to its state in the final game, only the prototype has one additional sea mine in the bottom-right corner.


The final adds a lot more prisoners here, and shuffles some item locations around. This third area has stencilled numbers on all the floors, from 1 to 5, bottom to top. These were all replaced by arrow signs in the final game to better guide the player through this tangle of elevators.
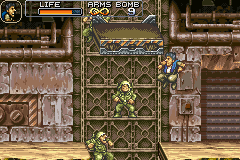
Speaking of, the lifts use a very preliminary sprite and have no collision, meaning you'll fall right through them. The elevator shafts depict girders instead of tracks, and some of them have geometry in their middles allowing you to jump on them to climb to higher areas; not all of them though, seemingly to represent how far their elevators are allowed to travel.
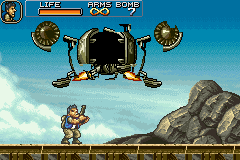
The boss is in the same non-functional state as the rest. Walking to the right will warp you to Mission 5, but a different location than if you entered it through the mission select.


 Go right and you will see another barrel. Repeat what you did for the fish to get an Enemy Chaser. Continue right and you'll see some funny rock formation things, stand underneath the second one, aim up and shoot and Card 005 Type-R will drop down. Keep going right and the screen will lock.
 You then need to make a jump across. This jump is VERY difficult to pull off, so expect to die a fair few times at this part of the mission. If you simply cannot make it, read [2] for a simpler method, albeit with a sacrifice.
 [3] Anyway, at the top of the large flight of stairs, jump left to a platform where you can see a box. Inside the box is the Card 025 E.Chaser+. From here jump up another couple of platforms and head left. A few enemies will pop out of the square black holes in the background, shoot them before they have the chance to see you. When you reach the end of the platform you are on, stand at the very tip of it then jump left and shoot and you will free prisoner (054) who has Card 028 Super TNT. When you do so you will drop down between a couple of rocket launcher carrying enemies and a rolling bomb throwing soldier. You will have to have good reactions to survive this part without taking a hit. Once these three enemies have all been killed, head left down some stairs and keep going left.
 [1] Go right here and watch out for enemies who pop out at you. The fifth black square in the background you see has Card 034 L.3 Armor in it, shoot at the square to make the card drop. Jump across to the garage door you see and shoot above it, prisoner (057) will drop down and he has Card 072 Eri. After getting this card, go to the elevator and let it take you up so you can proceed right, go right and you will see a orange soldier who will leap at you, so be careful. Once he is out of the way, go a bit more right and you will see a firework throwing soldier in front of a garage door, jump down to him and kill him then aim above the garage door and shoot to get prisoner (060) who will give you some bananas.

 Another tactic this boss has is to move off screen then sweep from the left to the right of the screen or vice versa firing lots of bullets, they can be avoided but expect to take a hit here. One final other tactic this boss has is to use the missile again, but before it drops the missile it will fly upward off screen and then rush downward, just run from one side of the screen to the other to avoid this attack. Keep shooting it and this boss will blow up and crash.


