Debug Menu
|
|
The debug menu is where the magic happens! If it weren't for this (and the tile viewer, I suppose), we wouldn't have access to most of the unused rubbish hidden inside the games. A common question regarding this is...
|
What do I need to access the debug menu?
To access any of these debug options in Metal Slug 2 through 5, you will need a Neo Geo Debug BIOS.
On the real Neo Geo hardware, this entails replacing the BIOS chip with a modified one, which requires a soldering iron and the possible risk of futzing up your console, so tread carefully. Search sites like Console Passion if that's what you fancy.
For emulators, the BIOS is a .zip file. You'll already need the "neogeo.zip" BIOS to run games in the first place, but the "debugbios.zip" BIOS is required to properly access these features. The two should be placed in the same folder (preferrably the "/roms" folder), and should not be unzipped.
However, some emulators have a hard time recognising the debug BIOS. If so, try using the Universe BIOS (or "unibios")... and if that doesn't work, just throw every single BIOS file you can find into "neogeo.zip". That usually gets the job done.
With the debug BIOS installed, you should be ready to go.
- Load up any Neo Geo Metal Slug game (except for the first) in console/AES mode.
- Now turn "Developer Mode" on (in Kawaks, at least - I don't know the procedure for other emulators or the real hardware). You may need to reset once it is turned on for the game to properly activate it; or you can disable the "Auto Run Game" option and tick it then, saving yourself the hassle of resetting.
- Make your way to the character select screen, and press the Select button twice (on emulators, the Select button should be the same as the Coin button).
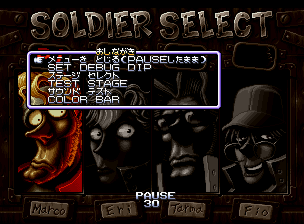
All being well, the debug menu should appear!
The debug menu is mostly identical throughout all the Neo Geo games, and can be summoned at any time, so long as you can pause. Options are selected by pressing the A Button, and the B Button cancels. Pressing B or Select on the main debug menu will unpause and return to gameplay.
Accessing Metal Slug 6's debug menu
Big thanks to candy76041820 for bringing this to my attention and documenting most of it, and _MetalliC_ of the Emu-Russia forums for apparently discovering this!
Since Metal Slug 6 runs on Atomiswave hardware (it's unknown if the debug menu is present in the PS2 port), activating the debug menu is a little different:
- On the title screen, insert a credit. Hammer the System, Player 1 Start and Player 2 A buttons repeatedly.
This is rather finicky and there's no indication you've succeeded until you reach gameplay. I found good success by assigning Service and P2 A to one key, and then assigning that key and Player 1 Start to buttons on a gamepad using Xpadder and applying the turbo function.
- Make your way to the first mission, and press the D & E buttons simultaneously (on P1 or P2's controls).

If the game pauses, you've done it! Press again for the debug menu! If not, reset and go through the hooplah again. It may take a few tries.
The debug menu behaves identically to the Neo Geo menu; use the Stick to move through options, A Button to select, and B Button to cancel or exit the menu. Depending on what player activates it, only that player's controls can navigate it.
Accessing Metal Slug 7's debug menu
A massive thank you to 이지우 (Lee Jiwoo) for unearthing the debug menu and providing all the codes to access it!
To enable the debug menu, you can either use the following Action Replay codes below, or use Cheat Engine to find the code address in DeSmuME and set its value to "1" (this has only been tested with DeSmuME v0.9.11).
| Version | Action Replay | Cheat Engine |
| Japan: | 2223FEA8 00000001 | 1456510F8 |
| Korea: | 22250428 00000001 | 145661678 |
| USA: | 0223F548 00000001 | 145650798 |
| Europe: | 0223F5A8 00000001 | 1456507F8 |
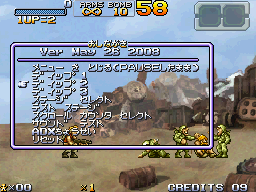
To open the debug menu, hold the Select Button and press the Start Button. If the game pauses and the word "PAUSE" appears, you're in! Do that again to open the menu. Press the A Button to select and the B Button to cancel. To close the menu, hold Select and press Start again.
Accessing Metal Slug XX's debug menu
Once again, hats off to 이지우 (Lee Jiwoo) for providing the access code for this!
Create a text file named "NPJH50044.ini" and enter the following code into it; make sure the code is for the appropriate regional version. This file can be read by the PPSSPP emulator or the CWCheat app on PSP hardware:
"NPJH50044.ini"
_C1 Debug (Japan)
_L 0x00558a40 0x00000001
"ULUS10495.ini"
_C1 Debug (USA)
_L 0x00554930 0x00000001
"ULES01429.ini"
_C1 Debug (EUR)
_L 0x0056B1C0 0x00000001

Hold the Select Button and press the Start Button to pause the game, and again to open the debug menu. Press Circle to select and X to cancel.
Other debug menus?
Although most of the Metal Slug games have debug menus, some have either not yet been found or function differently than the norm.
- The first Metal Slug does not appear to have a debug menu, but instead debug dipswitches and a level select.
- Metal Slug Advance has textual remnants of a debug menu, but as of this writing it cannot be accessed, if it's still operational.
- As for Metal Slug on PS2 and the Neo Geo Pocket titles, it is unknown if they still possess debug menus.
Debug Menu
Metal Slug 2/X
 |
Metal Slug 3/4/5
 |
Metal Slug 6
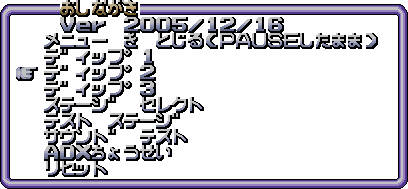 |
Metal Slug 7/XX
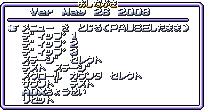 |
The debug menu is in a mixture of Japanese and English, and can be a bit hard to follow. Click an option to hop to its translation and explanation!
メニューを とじる(PAUSEしたまま)
MENU CLOSE (PAUSE STEP)
In Metal Slug 2 and X, this simply closes the debug menu and returns to the pause state.
From Metal Slug 3 onwards, it freezes the screen and steps forward one frame. The function can be repeated to step forward frame by frame, which is a great tool for screenshots. Simply open the menu and close it again to resume gameplay.
SET DEBUG DIP
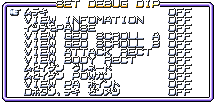
Opens a sub-menu for toggling dipswitches. This allows you to tinker with a variety of features, including collision data, coordinate trackers, invincibility, and even the ability to destroy all objects with the press of a button! Metal Slug 6 and 7 feature so many they're spread across three windows. See Dipswitches for more info.
ステージ スレクト
STAGE SELECT

Opens a sub-menu for accessing any of the game's stages and screens. See the Missing Areas page for each game to see where each option takes you.
TEST STAGE

Opens a sub-menu for accessing test stages, areas designed to play around and experiment with the game's features, though often not very exciting. See the Missing Areas page for each game for more info.
サウンド テスト
SOUND TEST
Opens a new screen for playing and testing the game's music, sound effects, and sound channels. See Sound Test for more info.
COLOR BAR
Metal Slug 2/X only

Opens a new screen with red, green, blue and white colour gradients, for testing the monitor's colour settings. Open the debug menu and use the Stage Select to exit it.
ADXちょうせい
ADX Tuning
Metal Slug 6/7 only

A small menu for adjusting the sound. よみこみ セクタ サイズ / Reading Sector Size is for... well, I'll take candy76041820's word for it and assume it "adjusts the machine's inner read buffer". BGM ボリューム / Music Volume makes the music louder or quieter; 000 is the loudest, 512 puts it on mute, though the difference is negligible in Metal Slug 7.
スクロール カウンター セレクト
Scroll Counter Select
Metal Slug 7 only

A sub-menu used to start a screen a certain distance in, using the VIEW INFOMATION's "SCROLL" coordinate. The distance can be adjusted by pressing Left and Right; warping will reload the screen and may cause certain objects to not load. The player will enter the way they normally enter the screen, be it via parachute, walking in or falling in.
リセット
RESET
Metal Slug 3 onwards
And finally, selecting this will reset the game. In Metal Slug 7 it will instantly game over.
Dipswitches
Metal Slug 2/X
 |
Metal Slug 3/4/5
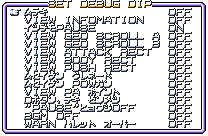 |
The SET DEBUG DIP menu may not be interesting, but it's most certainly useful. It has a number of conveniences to make things easier than tinkering about with the games, such as invincibility and unlimited ammo, but some options can give you a glimpse into the workings of each game, seeing how the collision and hitboxes work for each object.
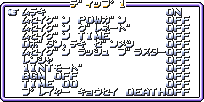
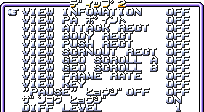
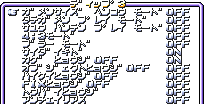
From Metal Slug 6 onwards, the dipswitches are categorised into ディップ1 / DIP 1 (player options), ディップ2 / DIP 2 2 (system coordinates and hitboxes), and ディップ3 / DIP 3 (audio and display options).
Some options may only function after a new area is loaded.
In the Neo Geo games, the dipswitches can also be activated through the "debug dipswitches" option in Kawaks.
ムテキ
INVINCIBILITY


Renders the player invulnerable to all damage, except instant death states such as crushing or falling down pits. Curiously, the Slug Flyer is still capable of losing its vulcan cannon after 3 attacks; thanks to candy76041820 for this little known fact!
VIEW INFOMATION

(Is there an "R" in the house?)
Prints a string of numbers along the top of the screen, for a variety of debugging purposes. From left to right, top to bottom:
- PROCESS: Flickers hexidecimal numbers as actions take place on-screen. How much processing power is being used, I assume.
- FREE: Appears to be related to PROCESS. How much free processing power is left, I assume.
- ZOMBIE: Has no bearing on the zombie transformation from Metal Slug 3; this showed up before it, anyway! This seems to keep track of all 'dead matter' on-screen, such as flying soldier bodies, debris, etc.
- VIEW: The two figures track the horizontal and vertical positioning of the screen on the level's map.
- SCROLL: Shows how far into the level you've travelled.
- ENEMY: Records all enemies on-screen across nine two-digit coordinates. Seems to only record enemies vital to the screen's progression - incidental or endlessly spawning enemies usually aren't tracked on it.
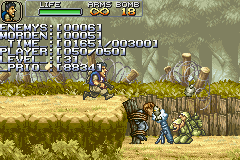
For its comparatively simple hardware, Metal Slug Advance overhauls its coordinates almost entirely.
Both ENEMYS and MORDEN record how many enemies have been defeated, though ENEMYS will record all enemies (tanks, helicopters, etc) and resets after a mission is complete. MORDEN only counts infantry and keeps a permanent record, likely to determine the unlock condition for the Soldier A, Soldier B, etc. cards.
TIME is simply a timer that counts up from the start of every screen. Likely used to determine the unlock conditions for the bosses' cards.
PLAYER is the player's health bar.
LEVEL is the difficulty setting. Normal is Level 3 and Hard is Level 8.
_PRIO_'s purposes are currently unknown. It reads "8834" during normal gameplay, changes to "E0EC" when your character dies (or parachutes in at the start of Mission 4), and "FFFF" on all menu screens.

Metal Slug 6 rearranges the information slightly: enemies are tracked along the EC line (and EB too, I think?), and it now tracks player 1's position with the P1 coordinates... but not player 2, strangely.
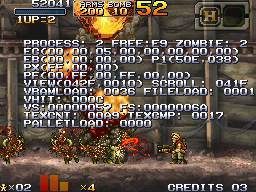
Metal Slug 7 adds additional information relating to the Nintendo DS' VRAM limitations. Heck if I can make heads or tails of it!
イツデモPAUSE
PAUSE WHENEVER
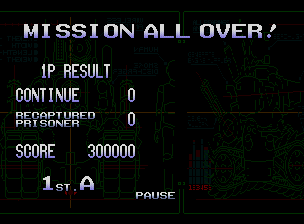
Removes the restriction from pausing on certain screens, such as endings.
VIEW GEO SCROLL A
VIEW GEO SCROLL B

Marks all land that the player can stand on with yellow shaded lines. This will result in visual glitches though, such as wonky scrolling, backgrounds objects or the HUD becoming invisible, and so on. If one dipswitch no longer works, try the other one - VIEW GEO SCROLL A stops working halfway through Mission 1 of Metal Slug X, for instance, but GEO SCROLL B will work for the remainder of the level.
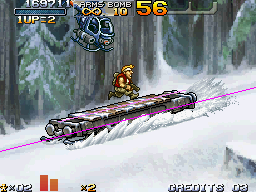
Metal Slug 6 and 7 behave a little more reliably. VIEW GEO SCROLL A denotes static "backdrop" collision with deep-pink/purple lines, while VIEW GEO SCROLL B displays collision with sprite-based platforms using light-pink lines.
VIEW ATTACK RECT

Displays "attack" hitboxes with diagonal arrows; this shows what objects will damage things, be it the player or the enemy. Also used to show the range the player or enemy needs to be before they'll use their melee attacks.
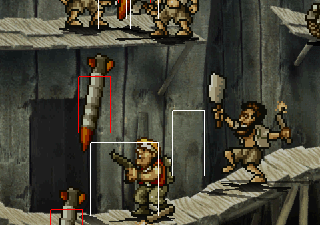
Metal Slug 6 onwards differentiates the two; red rectangles dictate harmful objects, while white rectangles show the range when players and enemies will perform melee attacks.
VIEW BODY RECT

Displays "body" hitboxes with right-angles; this shows what objects react to damage, such as the player, enemies, destructible scenery, and hotspots.
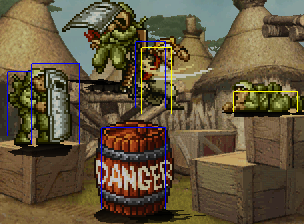
Metal Slug 6 appears to colour-code objects: yellow rectangles can be walked through (enemy soldiers, etc) while blue rectangles are solid (shields, boxes, etc). Metal Slug XX adds on this by making the player's hitbox cyan, but Metal Slug 7 drops the colour-coding and all hitboxes are blue.
VIEW PUSH RECT
Metal Slug 3 onwards
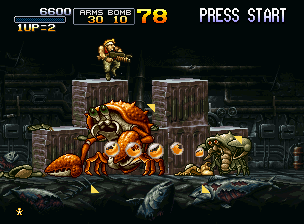
Displays "push" hitboxes with triangles; this shows what sprites the player cannot move through, such as tanks, zombies and giant crabs.
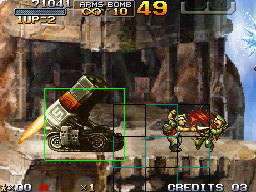
Metal Slug 6 and 7 use green tectangles to denote these hitboxes. 7 also flashes this strange 3x3 teal square grid whenever the player uses a melee attack.
VIEW SCRNOUT RECT
Metal Slug 7 onward

Displays "interaction" hitboxes. Yellow rectangles are for hostiles (when a soldier will stop to knife you, etc.), pink rectangles are for passive objects (prisoners or interactive scenery), while pink lines stretch from objects to the player to determine pathfinding for wandering prisoners, whether the target is in range for projectile-shooting enemies, and more.
ムセイゲン グレネード
unlimited grenades

Grants the player unlimited grenades.
ムセイゲン POWガン
unlimited ammunition

Grants the player unlimited ammunition.
VIEW PAポイント
view player arrival point


Metal Slug X / Metal Slug 3
Marks on screen where the player will respawn if they die. Metal Slug 2 and X denote the position with a discoloured sprite of Satiko Suzuki, the grieving girl from the ending of the first Metal Slug, while the other Neo Geo instalments use a frame from Marco's respawn animation.


Metal Slug 6 / Metal Slug 7
The later games just use coloured lines; a white horizontal line in Metal Slug 6, and vertical blue and red lines in Metal Slug 7.
Dボタン、テキ ゼンメツ
D Button: enemy destruction
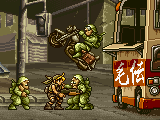


Ooh, baby! Press the D Button (the R Button in Advance and the L Button in 7/XX) to destroy everything on-screen. This includes killing enemies, freeing prisoners, wrecking scenery, and hitting hotspots.
"PAUSE"ヒョウジOFF
"PAUSE" INDICATOR OFF |
Metal Slug 3 onwards
Removes the flashing "PAUSE" caption when paused. |
|
BGM OFF |
Metal Slug 3 onwards
Turns off the background music once a new screen is loaded... at least, in Metal Slug 3 it does! It doesn't appear to work in Metal Slug 4 or 5. |
WARN パレット オーバー
WARN PALETTE OVER |
Metal Slug 3/4/5 only
Beats the hell out of me! Any clues, readers? |
ムセイゲン TIME
Unlimited Time |
Metal Slug 6 onwards
Freezes the stage timer. |
ムセイゲン ラッシュ ブラスター
Unlimited Rush Blaster |
Metal Slug 6 onwards
The gauge for the coin-drop score bonus will never deplete. |
レンシャ
Rapid Fire |
Metal Slug 6 onwards
Holding the A button will fire your weapon continuously. |
1INTモード
1INT [?] Mode |
Metal Slug 6 onwards
Doubles the game speed. |
|
TIME 00 |
Metal Slug 6 onwards
Reduces the timer to zero, killing the players instantly. Will continue to do so until disabled. |
プレイヤー キョウセイ DEATH
Forced Player DEATH |
Metal Slug 7 onwards
Instantly kills the player. |
|
VIEW FRAME RATE |
Metal Slug 7 onward
Displays a frame rate tracker at the bottom center of the screen, measuring when the game enters slowdown. "02" seems to be the norm, "03" is slight slowdown, and "04" or higher is when things get chuggy. |
|
VIEW KEY |
Metal Slug 7 onwards
Displays coordinates tracking button presses on the bottom-right; the top-left is player 1's controls.
The fourth digit tracks the D-Pad (Right is 1, Left is 2, Up is 4, Down is 8).
The third digit tracks the buttons (Fire is 1, Jump is 2, Grenade is 4 and Special Attack is 8).
The second digit tracks the Change Weapon Button (8).
The bottom-right coordinate changes as you progress through stages but I can't identify what changes it. |
ザンコク ヒョウジ
Display Brutality |
Metal Slug 6 onwards
Changes blood colour. If set to "ON", it is red; if "OFF", blood will be white. In the Neo Geo games, this is accessed through the Neo Geo BIOS dipswitches. |
|
DIFF LEVEL |
Metal Slug 6 onwards
Changes the difficulty level from 1 to 8; in Metal Slug 7, Easy is 1, Normal is 4 and Hard is 8. In the Neo Geo games, this is accessed through the Neo Geo BIOS dipswitches. |
ガメンサイズ ベンコウ モード
Shrunk Screen Mode |
Metal Slug 6 onwards
Zooms out the screen. This offers a wider field of view, showing when objects and enemies load in from off-screen, and offers pixel-accurate visuals in Metal Slug 6. |
タテガメン プレイ モード
Tall Screen (Tate) Mode |
Metal Slug 6 onwards
Rotates the screen 90 degrees counter-clockwise. |
サュウ ハンテン プレイ モード
Mirror Mode |
Metal Slug 6 onwards
Flips the screen horizontally (but not the HUD). Directional controls are flipped as well. |
バイリニアフイルター
Vertical Filter |
Metal Slug 6 only
? |
バーチカルフイルター
Bilinear Filter |
Metal Slug 6 only
Applies a blurring filter to all sprites. |
スーパーサンプルフィルター
Super Sampling Filter |
Metal Slug 6 only
Applies a blurring filter to all sprites. |
ディザ OFF
Dithering OFF |
Metal Slug 6 only
Disables dithering; only ever noticeable if you zoom in on sprites. |
4:3モード
4:3 Mode |
Metal Slug 7 onwards
Squashes the screen to 256x180. |
ブラー モード
Blur Mode |
Metal Slug 7 onwards
Applies a motion blur to the screen. The debug menu is prone to "burning in" until the background moves, as seen in the image above. Likely built in advance for the display options in Metal Slug XX. |
サイダイキド
Maximum Brightness |
Metal Slug 6 onwards
Adjusts the brightness to sprite-accurate levels. Enabled by default in Metal Slug 7 and XX. |
カゲ ヒョウジOFF
Shadow Display OFF |
Metal Slug 6 onwards
Disables all shadows if set to "ON". Enabled by default in Metal Slug 7 and XX; the shadows were only ever used in Metal Slug 6. |
オブジェクト ヒョウジOFF
Object Display OFF |
Metal Slug 7 onwards
Hides all sprite objects. |
ハイクイヒョウジOFF
Background Graphics OFF |
Metal Slug 6 onwards
Hides all background graphics. |
FIXヒョウジOFF
Fixed Graphics OFF |
Metal Slug 6 onwards
Hides all HUD graphics. In Metal Slug 6 the debug menu is still visible, but all other games hide it too! |
トウバイヒョウジ
True Scale Graphics |
Metal Slug 7 onwards
Zooms in the screen; this shows the sprites at their pixel-accurate size. The camera becomes more fidgety, and whips around when you turn left or right akin to Metal Slug Advance. |
アンチエイリアス
Anti-Alias |
Metal Slug 7 onwards
I'd assume this would enable anti-alias image softening, but I can't tell the difference! |
Sound Test
Tucked away in the debug menu's fifth option is the sound test! There's a different interface between Metal Slug, 2 and X versus Metal Slug 3 onwards, but the basic function remains the same - the ability to test all the sound effects, voice clips and music tracks in the game.
In the first Metal Slug, this is accessed by ticking debug dipswitch 2-1, then while in a mission, holding Up and pressing the D Button. Thanks to Keitaro Red for this information!

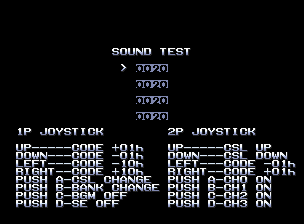
Metal Slug / Metal Slug 2
The first three Metal Slugs utilise the same sound test screen, which helpfully explains all the controls at the bottom... albeit in a terribly vague manner.
| 1P UP/DOWN | Scrolls through sounds forward or backward by 1. |
| 1P RIGHT/LEFT | Scrolls through sounds forward or backward by 10. |
| 1P A BUTTON | Scrolls down through the chanells. |
| 1P B BUTTON | Toggles between banks on the current channel, from 0000, 1000, to 1100. |
| 1P C BUTTON | Silences music. |
| 1P D BUTTON | Silences sound effects. |
| |
| 2P UP/DOWN | Scroll up or down through the channels. |
| 2P RIGHT/LEFT | Scrolls through sounds forward or backward by 1. |
| 2P A BUTTON | Plays selection on channel 0. |
| 2P B BUTTON | Plays selection on channel 1. |
| 2P C BUTTON | Plays selection on channel 2. |
| 2P D BUTTON | Plays selection on channel 3. |
Sounds are organised hexidecimally, from 20 to FF. You're best using player 2's controls, as player 1's are pretty fiddly and not very intuitive. The selections between all the channels are identical. 0020 to 0031 is used for background music. The 1000s are for gameplay sound effects - explosions, enemy screams, weapon sounds, background noises, and so forth. 1120 to 116E is mostly dedicated to voice clips - player screams, Allen O'Neill's taunts, and announcer chatter, with only a few exceptions.
Metal Slug X features a few voice clips that would go unheard until Metal Slug 3, such as the CEO's "hi!", Uki's chittering, and announcements for the Mobile Satellite and Thunder Cloud.
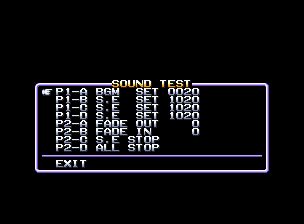
Metal Slug 3 and onwards greatly simplifies the sound test. There's no need to manhandle buttons on both players' sides, there's no mucking about between banks and channels. It's pretty straight forward, actually.
| 1P UP/DOWN | Scrolls through sounds and options. |
| 1P RIGHT | Selects an option. Press again to exit option. |
| 1P LEFT | Scrolls between sound, bank, and function during a selection. |
| A/B/C/D BUTTON | Plays corresponding option. |
The sound test is a lot more customisable now. Each of the eight options can be fiddled with and played with the A, B, C or D Buttons on player 1 or 2's side. Besides selecting sounds and banks on each option, you can also change the function of that selection! The functions include...
- BGM SET: Plays music.
- S.E SET: Plays sound effects.
- S.E SET: Will interrupt a sound if it and S.E SET are set to the same value.
- FADE OUT: Currently playing music will fade out; fade is quicker depending how high it's set, from 00 to FF.
- FADE IN: [I can't get this option to work for me!]
- TEMPO: Alters the tempo of music, from ungodly slow (0000) to double speed (FFFF).
- BGM STOP: Silences music.
- S.E STOP: Silences sound effects.
- ALL STOP: Silences everything.
Changing the function means you can turn individual buttons into fade outs, tempo modifiers, or silencers as you please. Not a lot to help to anyone but the developers and amateur DJs, but the user-friendliness is commendable.
This sound test remains in Metal Slug 4 and 5, though with spotty functionality. None of the music will play in 5's version, possibly due to its advanced sound quality rendering it incompatible.
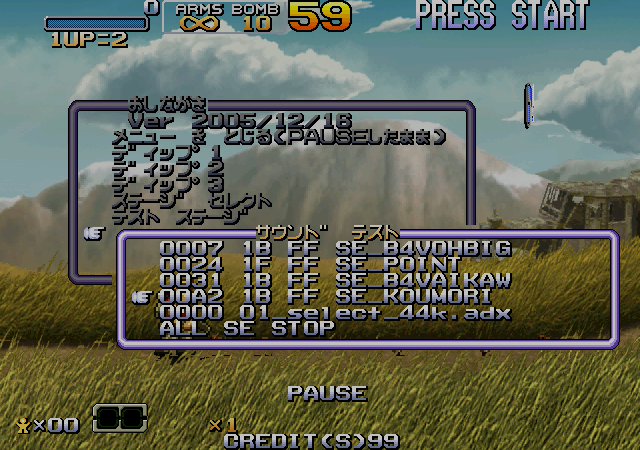
Metal Slug 6 changes things up yet again and simplifies its to just playing sounds and music - forget about fade-outs and tempo-settings! On the bright side, you can now use the sound test without ending your gameplay session.
The first four settings will play sound effects, only starting at various category changes. 01 to 23 are mostly announcer voice clips, 24 to 30 are mostly sounds for the HUD, and so on.
The final option will change the background music.
As mentioned above, Metal Slug X features sounds not heard until 3, and it's quite possible there's more unused sounds to be found hidden deep inside them... but I'm deaf as a post and, jeez, do you know how many sound effects are in each individual game? It's a heck of a lot, pal. I'm in no place to distinguish one explosion from another and see if they're unused.
.... that said, if you can find anything worthwhile, good goin'!
Metal Slug dipswitches
The original Metal Slug has no debug menu (to anyone's knowledge, at least!), but it still retains functions that can be accessed via the debug dipswitches. You can find these in Kawaks under the Game > Neo Geo settings. On real hardware? Beats me, buddy!
Should anyone know any further functions to be found via the dipswitches, do let me know!
DIP 2-1
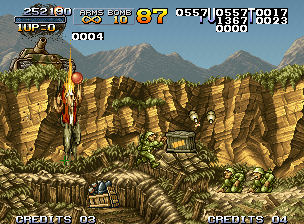
Displays seven sets of coordinates, six on the top-right and one beneath player 1's HUD.
- The set beneath the HUD denotes on-screen enemies, though it doesn't seem to recognise some foes, particularly endlessly-spawning enemies.
- The small green marker is where the player will respawn.
- The coordinates on the left-side tracks how much of the level has been travelled.
- The centre-top and centre-middle sets record horizontal screen coordinates.
- The rightmost sets record vertical screen coordinates.
- As for the centre-bottom coordinates, I've yet to identify their role.
This also enables access to the sound test and level select by holding Up and pressing the D Button. Thanks to Keitaro Red for this information!
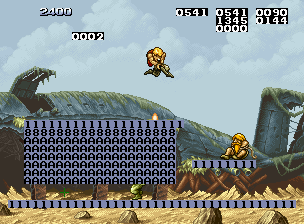
Pressing the A and D Buttons simultaneously will behave like a primitive version of the VIEW GEO SCROLL dipswitch, highlighting terrain with hexadecimal tiles. This can also be done with the B and D Buttons too, using a different numbers and colours for the tiles; it is currently unknown what the difference is. Pressing the C and D Buttons will turn it off.
DIP 2-3
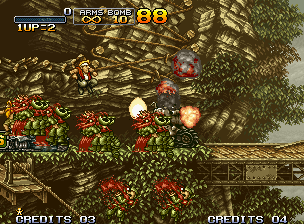
This is effectively the prototype of the "D Button: enemy destruction" dipswitch. Using Player 2's controls, hold Right and press the A Button to destroy all enemies and objects on-screen. Credit goes to Mr_Beacon00 (信标先生) for this discovery!
DIP 2-4

This switch will render the player invincible, and will lock the Metal Slug's health gauge at maximum. This also has the amusing side effect of making the player bounce off the electricity pylons in Mission 2.
DIP 2-5
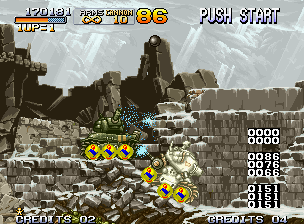
This dipswitch specialises in tank tread physics, displaying coordinates and graphical indicators applying to the Metal Slug and the Girida-O tanks. The coordinates will not appear until a Metal Slug is on-screen, and will cease operations once it leaves the screen or is destroyed.
The purpose of the top set of coordinates are unknown. The middle set track the Slug's horizontal position on-screen, and the bottom set for the vertical position.
A set of unused graphics, balls with roman numerals, are used to record the position of the tank treads.

While on solid ground, all three balls are yellow. That means they're glued to the ground, and are active.

While jumping, the centre ball turns yellow and the others turn black. Only the yellow ball will pay attention to collision data of the ground.

Upon landing or crossing a slope, the side balls may turn white, meaning the tank may tilt in that direction until it stabalises on solid ground.

Likewise, if the Metal Slug tilts upon going up a slope, the tank itself will turn pale. It returns to normal colour upon rolling onto flat or 45-degree slopes. This, assumedly, is an indicator for what angle it will be facing when jumping.
DIP 2-6

Locks Y-position. Thanks to 이지우 (Lee Jiwoo) for cluing me in! This only applies to jumping; falling off ledges or parachuting will make the character fall like normal.
Metal Slug Advance
debug remnants
As of this writing, we're aware of a debug menu inside the game by its text strings, complete with stage select (found by stoffhime1 at hex coordinate 7D8C0) and debug dipswitches (at hex coordinate 797B0), but there's no known way of loading that menu in-game yet.
Its debug dipswitches are still accessible via memory editing, either through Mr. Beacon00 (
信标先生)'s Cheat Engine Table (which I've yet to have success using), or through VisualBoyAdvance's Memory Viewer. Select "16-bit" on the Memory Viewer window and enter "3002AF8" before pressing "Go".
The first four digits (which should be "0000" by default) toggle dipswitches on and off, and changing the digits to the coordinates below will toggle the various options. One digit will cover multiple dipswitches, so there are coordinates for having two or all three options active at once.
I've yet to access the VIEW GEO SCROLL dipswitches, and despite its name, the "Pause Indicator Off" dipswitch is actually the "Pause Whenever" option.
이지우 (Lee Jiwoo) provided a savestate with the "VIEW INFOMATION" dipswitch activated (compatible with VisualBoyAdvance-1.8.0-511).
USA
EUROPE
JAPAN
ENDING
select country
<< >> |
Right behind the "PRESS START" text at hex coordinate 000797B0 is an unused country select option... which is interesting, since the Japanese version has complete English text for all menus and cards in its data.
If you're talented enough to access the debug menu in-game, tell me all about it!


