Sprites
& How To Rip Them
ripping from gameplay
Ripping sprites from gameplay is just like it sounds: you play the game until you see the sprite you want, and you screenshot it!
If it's an animation, then you'll want to screenshot all of its frames of animation; any emulator worth its salt should allow you to pause the game, and preferably alter the speed or frame-advance as well -- these make capturing frames a lot easier than just timing the PrintScreen key at the right time! (believe me, i did that in my early days)

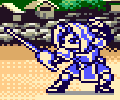
Wario Land 4 (Game Boy Advance)
Depending on the sprites you're after, and how exhaustive you want to be, this can be a simple job or a lot of work. For a fighting game, starting a 2-player match and knowing a character's inputs should be enough to get you started.
Enemies in other genres might require goading and baiting them in ways to capture the sprites you want, and in a platform game it can entail knowing every gimmick in every stage the player has unique animations for interacting with...!

Donkey Kong (Game Boy)
Did you know this game had a tutorial, or even an attract mode? A lot of folks who ripped Mario's sprites didn't!
My big detriment to this style of ripping is-- you gotta play the game! If it's a long game with a lot of depth, I better know it inside-out to be confident I've ripped an object's sprites exhaustively, and hope there's passwords or save files to rely upon if need be...!
Ripping from gameplay isn't looked highly upon by some, because you can never be too certain how comprehensive it is. Is there an obscure animation that only plays once eighty levels into the game? Do the sprites even look that like that in the game data; are a character's limbs stored as separate pieces, for instance? It's why tile-ripping is considered a more 'exhaustive' method, even though it's not without its own hiccups.
That said, screenshot ripping is appreciated from a WYSIWYG perspective; it looks like it does in the game! You don't have to assemble a complicated multi-segment sprite yourself, and there's less risk of a sprite being assembled incorrectly. It's got its quirks, but it's a good place to start and remains a good skill once you've more tools under your belt. Do take these into consideration before you start though!
● Capturing: Ideally the emulator should have a screenshot function (one that saves in BMP, PNG, or GIF for low-colour platforms), but capturing the window with PrintScreen and pasting it into a paint program will suffice. An external tool for capturing screenshots or lossless ("full-frame") video like Bandicam or AnimGet is also good.
For the record, make sure frame skip is disabled. Ripping a full animation is gonna suck if the game is skipping frames!


Cyber-Lip (Neo Geo)
● Display settings: Make sure you're running the game at its original screen resolution and aspect ratio, with no filters -- you don't want to rip blurry, stretched-out sprites! Clean upscale options like 2X should be fine, but if it's got any post-processing like bilinear filtering or the like, turn that junk off.
Be aware that for games on 3D hardware like the Nintendo 64, PlayStation, etc., this might be a no-go because of camera zoom, built-in filtering, or simply how they handle 2D elements. It depends on the game, obviously, but you'll want to get acquainted with tools for those platforms and beyond. Keep reading though, there's hope yet!
● Layers: Consoles built primarily for 2D sprites typically handle their graphics in layers, with dedicated layers for sprites, backdrops, menu overlays, etc. A good emulator will have options to disable these layers, which saves you the trouble of having to remove the background manually!
This might not be feasible on some platforms/emulators; as mentioned above, 3D consoles handle their graphics differently, so there's no platform-wide option like this any more. Other possibilities are when 3D backdrops or elements are considered 'sprites' too, and can't be disabled without rendering the sprites invisible as well! If you can't navigate to a clean backdrop for easy separation, there's still solutions you can find.
Just for funsies, here's a few examples of potential mishaps:

Double Dragon III (NES)
While the background is easy enough to remove, the blacks are the same as the sprite. Manually repairing the outline should be a last-ditch solution, you want to avoid palette overlap as best you can...!
Samurai Shodown II (Neo Geo Pocket)
No palette overlap here, but the sprite's stretched out of shape -- someone didn't fix their display settings! This might be fixable with SpriteHoe, but you'd rather not have to do that at all.

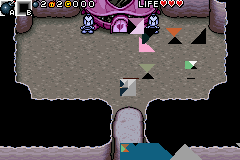
Wario Land 4 (Game Boy Advance)
While the background can be removed manually, the foreground layer is overlapping the sprite, meaning it'll be missing a chunk of it.

Jurassic Park Part 2 - The Chaos Continues (SNES)
Even with the layers removed, there's no saving a sprite when it's filtered...! Disable those video options!
If all you want is a few sprites or animations for reference and personal use, ripping from gameplay is a reasonable method, though if being comprehensive is what you crave, then you'll want to get a bit more adventurous. Tinkering in the game code itself can offer options and insight glancing at graphics data can't offer -- let's crack this baby wide open...!
RAM editing
We've talked about how knowing the game is key to a good in-game rip... let's pull back the curtain and get tinkering behind the scenes!
RAM, or Random Access Memory, is where the game stores and interacts with the data it's presently using; there's more technical ways of describing it, but for our purposes, it's a big messy toybox to play with! It's the foundation for old-school cheat tools like your GameSharks and what-have-you, tinkering with the numbers that make up your lives, your score, how the player moves, what level you're on, or any number of things.
Most good emulators should come with tools for viewing or editing RAM, whether it's called a Memory Viewer or RAM Editor or whatever. Failing that, Cheat Engine is an extremely robust alternative, with more tools and functions than most built-in RAM editors.
I'll be using the emulator BizHawk for this demonstration, as its RAM editor is good and multi-purpose for our needs, and applies to a wide range of consoles.

Shinobi III: Return of the Ninja Master (SEGA Mega Drive)
A quick way to get acquainted with RAM is to try and find something you have direct control over, like the player's position, what menu option is highlighted, or a numerical value you can change.
In the example above, RAM address 37E3 correlates to the number of shuriken in stock, and was found by searching for addresses Equal To a Specific Value -- in this case, 78. If I throw another shuriken and the found values go down, then I can narrow down my search.
You can freeze an address (with Ctrl+F) or "poke" it (Ctrl+P) to change its value; a good way to determine which of the results are relevant, and ultimately your goal from this search: memory addresses you can play with!
The "Size" and "Display" options are important for finding things: memory address values are typically stored in hex, or hexadecimal -- this is a number that counts in "base-16", meaning it goes from 0 to 9, and then another six digits, A through F, before it enters double digits. Thus, hexadecimal "10" is actually 16 in decimal, and the number "FF" is actually 255, which is why it's such a ubiquitous number in so many old games -- that's as high as a single byte could count!
Display allows you to display values in a number of ways, but Hex and "Unsigned" (or decimal, regular base-10 numbers) are what's important for now; Signed and Binary have comparatively niche applications. It can be worth toggling between decimal and hex when finding numerical values; values that increase in nonsensical manners in decimal might be more coherent in hex, or some games might store each digit of a timer as a separate hex byte.
Size correlates to the number of bytes in a value, essentially increasing how high it can count -- 1-byte can count as high as 255, 2-byte goes up to 65535, and so on. This might result in overlap between unrelated addresses, however; searching for a 2 or 4-byte value will help when finding a character's position on a large map, but for item stock or smaller values, you might want to dial it down to just 1-byte. If you have a rough idea of the 'limits' of the values you're after, that'll help you narrow down the size.

B.O.B. (SNES)
2D games typically measure positions in relation to their top-left boundary, so if you walk right or go down, that counts as a value increasing (or "Greater Than"). If you walk left or go up, check if a value has decreased (or "Less Than"). When no movement has been made, search for "Equal To" results... and if you've no idea what way it might go, try "Not Equal To".
Play with the results and see what happens; freeze them and see if the player refuses to budge, or stick in a new number and watch if they've warped somewhere new. I wound up out-of-bounds without even meaning to in the example above, and wasn't sure how to get back, so do make savestates before you get too rambunctious...!
It might only have tangential use to sprite-ripping, but it's a good first step when exploring any new game, and it'll give you a feel for how the game handles its data. Keep tabs on your findings, and don't be afraid to explore and just screw around with things!
What we really want to find is whether or not you can change the sprites, be it loading a new animation, locking animation frames, or even swapping out an object for an entirely different one. There's no exact science to this, as every game handles its sprite-loading code differently, it's just a lot of poking and prodding and seeing if it plays ball...!
Typically you're just gonna use the "Not Equal To" search a bunch, and apply it wherever you see fit. Step frame-by-frame and search again whenever a new frame of animation is played. Maybe try it during different animations? Play it in slow-motion, fiddle with values near relevant results, and just sort of finagle your way around to see if something clicks.
Bomberman Tournament (Game Boy Advance)
Results vary, especially on games with limited VRAM. Bomberman Tournament does have code that can change Bomberman's animation, but if that animation hadn't been 'activated' legitimately and loaded into VRAM, the sprite will just look like garbage. It's possible you could find a way of poking the code to make it forcibly load graphics into VRAM, but that's a deep dive that'd require some proper insight into the game's code, and not just manhandling basic patterns.
Games like Bomberman DS, meanwhile, are extremely cooperative and let you change the animation frame willy-nilly. Even if it can only let me change the animation of its given sprite, not swap that sprite for a different object, it's still a great resource to find. That game's internal files are encrypted and, as of this writing, inaccessible to ordinary DS file-investigating tools, so this is a terrific alternative.
Every game handles it differently, some more generous than others; swapping one object for another might just be an address not far away from its animation, it might require 'reloading' the area or outright hacking the game... or one address might handle the sprites of all objects in the game. Once I found Sketch's animation value in Comix Zone, I could leaf through to every single enemy or object it had to offer!


Comix Zone (SEGA Mega Drive)
When you do find values that look promising, make a note of it and try to set the scene for a good sprite-ripping environment. Find a safe in-game area where you won't be bothered by time limits or enemies (though ideally you can load state if such a thing occurs).
Disable background layers, or failing that, find a background with easily removable contrasting colours, or even edit the palette yourself if you can find it in RAM. Have access to the addresses for camera and sprite positions, just in case it should go off-screen for any reason.
For Comix Zone, this involved locking the camera, editing the background palette, moving the enemy below off-screen, and editing the savestate to remove the shadow graphic. However, swapping the sprite is really playing the baked-in animation, meaning effects pertaining to them still remained -- the screen would flash during explosions, flying enemies would fall off-screen, etc., so it's a process that might require some babysitting.
When you're set up, this is a good time to look into a macro to assist in capturing the sprites! Telling Cheat Engine to advance the sprite value with a key press can help a lot, but advancing through sprites one at a time and taking screenshots is deathly boring. If you can get something like MacroRecorder to automate the process by changing the value and saving the results, then you can leave it to it and go do something else!
As aforementioned, it's not a process without total lack of supervision -- it might skip a value, or the game might misbehave in some way. If you're using an external program to take screenshots, be sure to include the sprite's value in-frame -- that way you know where to look if a sprite is missing or giving you trouble. The last thing you want is to go scrounging through potentially hundreds of values to find it again...!
Although I much prefer Cheat Engine for its ease of use and all-purpose functionality, it's still an external tool, and effectively fighting with whatever program it's interacting with. This means results can be spotty compared to using the emulator's own RAM tools:
Trying to find the animation addresses in Super Bomberman 5 was almost totally fruitless in Cheat Engine, but switching to an emulator with a built-in RAM editor suddenly made it so much easier. Every emulator handles it differently, and getting used to their quirks can be an ordeal... which is why BizHawk comes so recommended. Its emulation accuracy can be questionable, but that RAM Editor, boy howdy!
That said, Cheat Engine's a great tool to have on the side; being able to set hotkeys to freeze or change values can be very helpful, saving you the trouble of manually adjusting them yourself every time.

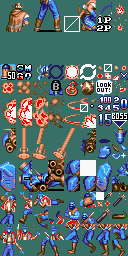
Metal Slug 5 (Neo Geo)
It bears repeating that this method is a crapshoot. Every game handles its code differently, and there's no guarantee it'll be be willing to work with external tampering. For every game like Mario Golf: Advance Tour that generously rewards me by requiring only one sprite address be modified, there's a Banjo Pilot or First Funky Fighter, games that also bore fruit, but not without fighting them tooth and nail to get what I wanted out of them.
Ultimately, some games just don't play ball as much as I'd like, and you simply have to take what you can get. As someone who enjoys the simple act of taking things apart and seeing what makes them tick, it's fun just to explore, but I can understand it's not exactly results-driven, and bound to be frustrating for a lot of folks...!
Saying all this... sometimes a game will be extra generous and just have a sprite viewer sitting in its code somewhere. It's why for a time Metal Slug 5's sprites were so more feverishly ripped than any other instalment's! They're not exactly common, and can often be hindered with fussy limitations, but when they work, they can save you a hell of a lot of trouble. Why scavenge through code like a chump when the game itself lays them out on a platter?
Hit up The Cutting Room Floor or GameHacking.org before you check out a game to see if there's any hidden functionality that'll make your life a whole lot easier.
tile ripping
Or simply referred to as ripping from the data, this method cuts out the middleman and goes straight to the source -- poking through the game's internal data to find the graphics that way!
Tiles are what most graphics are made up of; 8x8 pixel squares that are assembled to make up make up characters, obstacles, backgrounds, whatever graphic the game requires! You'll need a specialised tool to go poking around in graphics data; I'll spotlight YY-CHR to get us started.
The biggest hurdle of scouring through data for graphics, though, is... what am I looking at?


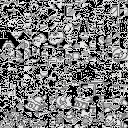
YY-CHR will typically open a NES ROM at where its graphics begin, but for any other game, you'll have to go scrounging yourself! This might entail scrolling through all of the game's data, which can look like television static when presented in visuals like this.
That first image on the top-left is just raw game data from Wrecking Crew (NES); if all you're doing is sprite-ripping, it's probably of no use to us.
It might be hard to recognise the star of Gimmick! (NES) chopped into pieces like that, but you can hopefully make out his eyes, his mouth, and so on. These are tile graphics! Their organisation and structure will differ between every game, but when you're tile-ripping, this is what you're up against: Some assembly required...!
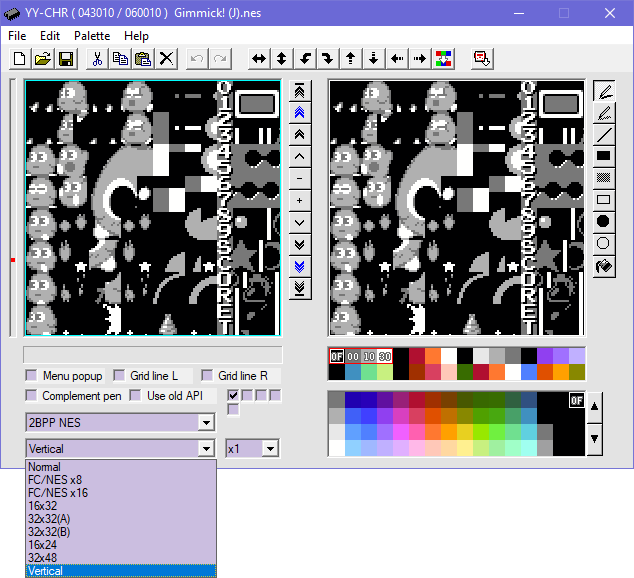
YY-CHR excels in being able to display tiles in different arrangements, though; that drop-down menu on the bottom left will offer you a variety of options. "FC/NES x16" will make our boy a lot more recognisable, and "Vertical" will practically assemble him right before our eyes! His horn still needs attached, but you can tell what you're working with this way.
It pays to experiment when the option is available to you, because to piece him together using that first arrangement would've been time-consuming...!

You'll notice one of the sprites is still missing its back. Since tile graphics are meant to be 'assembled', that means they often reuse tiles to save on space. Likewise, the large sprite only has tiles for one side of it; the existing tiles are to be 'mirrored' to finish its other side (demonstrated by the cyan tint above), with the extra set of cheek tiles applied.
This is a very forgiving example; some games are ruthless with how they store and reuse tiles, and trying to identify new frames of animation based on the scant few tiles they use can be a dickens...! Capcom's arcade games are particularly rough, often storing tiles for extremities halfway across the ROM from the rest of its sprite.

In our third example, these are graphics from Metal Slug: 1st Mission (Neo Geo Pocket), but they're not quite right...! They're misaligned or offset by a few bytes, and will need correcting. The Plus (+) and Minus (-) keys will take care of that in YY-CHR, though it might vary from program to program.
Though it might not be obvious from a 'page view' like this, make sure your tiles are properly aligned! A row of pixels bleeding onto the tiles below can totally mess up their assembly. Check them closely or whack a grid on them to make sure they're behaving the way they should.

I'm being cheatsy with this one -- these are graphics from The King of Fighters R-1 (Neo Geo Pocket), but viewed in the wrong graphics format. While all the examples so far have been from 4-colour platforms, they all encode their graphics in different manners. YY-CHR identifies the console each graphic format is commonly used for, though you may need to experiment when venturing beyond into other platforms.
While the junk on the left is unidentifiable as graphics, it is distinctly different from the white noise of regular non-graphics data in our top-left image. Having an eye for this is key when exploring more unorthodox games and file types; if something looks out of sorts, give it a closer look and try different options to see if you can make it recognisable...!
Like so, with these unusual patterns: you aren't going to make these comprehensible in a tile viewer though, because these aren't graphics, but actually the level data from Pocket Bomberman! Viewing a game's data through a graphics viewer is actually a neat way of visualising it, and when you notice distinct patterns among what's otherwise white noise, it might be worth keeping tabs on. It might be music data, level maps, palettes, canvas coordinates, or any number of things.
A quick way of figuring out what it does is simply deleting that chunk of tiles, or mirroring it, or any number of things. Boot the game up and if something's busted or it crashes at a specific point, then you've probably a vague idea of what it relates to! It's not exactly scientific, but it's baby's first reverse engineering. You really want to use a hex editor if you're gonna do something with that discovery, though.
Discovering valuable stuff like level data tends to be purely accidental, but it can be a valuable find, especially when pairing with a gameplay-rip. Being able to change level tiles can get you a more robust tileset than the raw graphics, as the game might use a variety of different arrangements. And if you're able to change what objects appear in a level, then that's a big help if you're ripping from VRAM.
This one is tricky -- you can kind of recognise something in that mess that looks like sprites, but there's no way they're ready for ripping...! Kirby's Dream Land, like a lot of Game Boy games, uses compression on its graphics (and a lot of its data in general), meaning you'd need to figure out the compression algorithm and decompress them before ripping them.
That enters the terrain of coding, disassembly, reverse engineering, and stuff that's way over my head...! It's certainly not impossible to crack, as evident by the sheer number of compression formats that have been busted -- if it's a first-party Nintendo game on the DS onwards, you can be certain somebody's found a way to get at it! But I'm not the one to teach you this skill, sorry...!
In cases like this, your best bet is simply ripping from gameplay, but that doesn't mean they're inaccessible though -- a game has to decompress its graphics to use them, and VRAM is where you'll find them! See that section for details.

Before we move onto some SNES sprites, it's worth mentioning the palette. Most graphic viewers will have a default set of colours, as well as options to load one either from the ROM or another file, including palette files or savestates, though that functionality might be outdated in the programs we're using.
Be aware these that default palettes are more often than not intended for 4-colour graphics, and often feature duplicate colours in their 16-colour setup. The pink colours in the GIF above show how much overlap there is in YY-CHR's defaults! Change that as soon as you can!
Finding palettes is its own kettle of fish, so it's recommended to set a placeholder palette where each colour is unique, distinct, and contrasting; you can apply the proper colours once you've finishing ripping or assembling them. The last thing you want when you're applying the palette is to realise some of the colours are shared, messing up the whole sprite and making your rip a waste...!

Jurassic Park (SNES)
I'm going to move to the unfortunately-titled Tile Molester for this portion to highlight some of its strong points. Although YY-CHR can handle Super Nintendo sprites, 16-colour (or 4BPP -- 4 bits-per-pixel) graphics is all it can handle; Tile Molester can cover up to 32BPP in a variety of formats, making it a more robust tool for exploring diverse games and file type -- Nintendo 64, PlayStation, you name it!
I mention Super Nintendo games for its unique "4BPP planar composite" format -- if the tiles are offset, it produces a 'shadowy' after-image like this, a quirk of the way it stores and displays graphics. Identifying 16-colour sprites without their correct palette is hard enough, but now you need to make sure you're ripping them properly, and not glitched like this!

Jurassic Park (SNES)
The downside of YY-CHR was that although you could rearrange tiles with its presets, you otherwise had no control over the canvas. Tile Molester allows you to resize the canvas, making it wider or taller, shorter or thinner, meaning it can potentially save you the trouble of assembling stuff manually. Jurassic Park stores practically all of its sprites in convenient little rectangles; why piece them together yourself when this tool can do it for you?
Going to View > Block Size > Full Canvas and unticking it will 'lock' the tile arrangement at whatever is currently set, allowing you to extend the canvas and get convenient little strips like the example above. In this case, I set the canvas to 4x6, unticked Full Canvas, and then stretched it to 32 tiles. You can't expect every game to be quite as convenient, but canvas options can help lighten your workload just a little bit.
It's worth keeping an eye on how the tiles are stored, and what's the best way to assemble them. Games like Metal Slug Advance tend to have a few bytes of data after each sprite, offsetting them just enough that you can't grab the tiles en masse easily.
Turok Evolution on Game Boy Advance, meanwhile, does store its tiles a bit more evenly, but making sense of them is easier if you grab them a small chunk at a time. We all have our methods we like to follow, but you gotta adapt to what the data gives you for best results!

Bomberman Party Edition (PlayStation)
Tile Molester also allows you to view 2-Dimensional, or Linear graphics. These are sprites that, rather than be assembled from tiles (well, usually), instead have a defined canvas size for each frame of animation. This is typically the norm for 2D assets from the PlayStation onwards, though it depends on the game, natch.
As you can see from the example above, you may need to change the canvas width constantly for a sprite to display properly... and in the case of Tile Molester, it can only adjust its canvas in increments of 8 pixels, meaning that particular distorted sprite is totally inaccessible.

Mario vs. Donkey Kong: Mini-Land Mayhem! (Nintendo DS)
That's why the last tile viewer we're going to check out is TiledGGD. Where it lacks the breadth of graphics formats or tile arrangement of the previous two programs, it's much better equipped for dealing with Linear graphics, or simply as an all-purpose exploration tool. If you're going to scout an unknown file, TiledGGD is the first tool I would recommend.
Using the arrow keys to change canvas size and PageUp/PageDown to scroll (and the various Skip Size options under the Image menu to adjust things), it's much more capable of working with these types of sprites.


Final Fantasy IV: The Complete Collection (PlayStation Portable)
A notable function it can do is Set Tile Size, allowing you create tiles of any even-numbered shape. Though the Mini-Land Mayhem sprites are Linear, they very rarely change canvas width, meaning I can set the tile size to 64x64, and tile them out like so. An immediate time-saver!
Some games on newer platforms, particularly the PlayStation Portable, tend to be stored in Linear format, but are actually tiles of unusual shape -- 16x8 has shown up quite commonly, or even 16x4! This does mean you've got even more possibilities to figure out to get a sprite looking like it should: the first image above is viewed in Linear, and then in 8x8 Tiled, before it finally looks the biz in 16x8 Tiled.
Lastly, TiledGGD has a built-in palette viewer, making finding colours relatively painless compared to the other two programs; another reason why it's my first choice when exploring new files!
Super Bomberman 2 (SNES) (address 1E2BC)
Just like sprites, palettes are stored differently from game to game -- some will store them in convenient blocks where nearly every colour is available, others will space them out, usually close to the sprite they're applied to, but not always. Finding them takes a similar eye to 'recognising' sprites, though when working with a game with a file system, you can usually expect the palette to be in the same file as its sprite, or in a similarly-named file.


HeroQuest (PC/DOS)
Palettes also come in different formats, from 2-byte to 4-byte, Big and Little-Endian, and various arrangements of Colour Order. Again, it all comes down to pattern recognition; if something looks like a palette, but isn't displaying quite right on its appropriate sprite, then you'll have to horse around a bit!
Above is the palette of HeroQuest in 2-byte, 3-byte, and 4-byte format, the last of which is as it should be. I was able to find this by simply eye-dropping a colour from a screenshot of the game, getting the hex value of that colour, and then using a hex editor to search for that value in the data dump. 4-byte colours are handy for that very reason (though it was fortuitous the colours were stored in RGB, and not a different colour order!), while other palette formats typically requires finding their colour values in RAM first to know what values to look for.

Golden Axe III (SEGA Mega Drive) (address 323B4)
TiledGGD does have its limits, and there are occasional palette formats it can't deal with; the SEGA Mega Drive stores its colours in 9BPP RGB, doesn't play ball this this tool (above), but Tile Molester can natively recognise (below). As dreadful as that program's palette interface is, it's got more robust options for displaying them, and you edit its .XML file to add support for more than are included in its base options.
That should hopefully cover the basic understanding of tile-ripping and what challenges to expect! Of course, this is about looking through raw game files -- what if that isn't the answer, whether because of compression or lack of access, and ripping from gameplay isn't cutting it either? Time to boot up the game again as we go trawling through VRAM...!
VRAM
VRAM stands for Video RAM! Much like how RAM is the data the game is currently making use of, VRAM is where graphics it's currently using are stored, and is a valued aid to both methods of ripping. If a screenshot rip looks like it's composed of 'pieces' that you want isolated, checking the VRAM can confirm that. If a tile rip is hindered by compression or simply not finding what you're after, VRAM is a good place to look.

Wild Guns (SNES) / The Flintstones (SNES)
For games or consoles that are rife with compression or complex file formats, dumping from VRAM is essential -- it's easier to work with the game than fight it, so to speak.
A common quirk, however, is that it may dynamically load sprites as they're needed, making it no better than a screenshot rip; the player characters in the two examples above have only a single sprite loaded. If you can't find those graphics uncompressed in the ROM, that's typically a sign you want to fiddle with RAM instead. The two work in conjunction!
Aleck Bordon Adventure: Tower & Shaft Advance (Game Boy Advance)
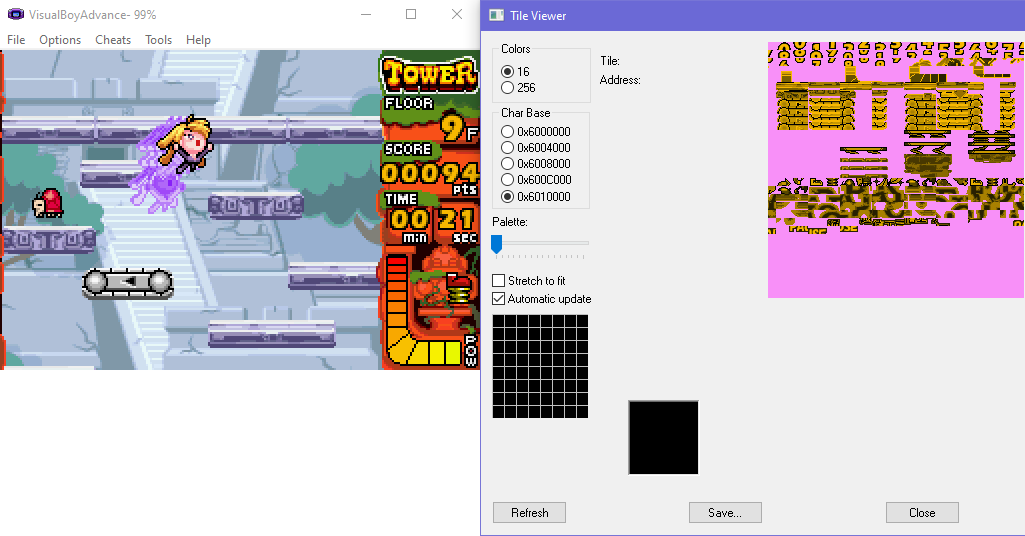
Accessing VRAM can be a bit variable. The best kind is when an emulator has a built-in viewer, as these typically allow you to view graphics in different palettes, auto-update to see what's loading during gameplay, or even see the RAM addresses of specific tiles. VisualBoyAdvance in particular is great for this -- is a graphic getting in the way during a screenshot rip? Find the troublesome tile, go to that location in the memory viewer, and blank it out with zeroes!
If that's not an option, typically making a savestate and opening it in a tile viewer (or extracting it first with an archive tool like 7Zip) is all you need! All the data it needs to restore from where it left off is saved in a savestate, after all, and that includes VRAM, palettes, the works. Some emulators may compress their savestates though, making this a no-go unless you can disable that option, requiring either an external tool or simply trying another method.
The same principal applies to PlayStation 2, GameCube and the like, only those emulators typically also allow you to dump textures as they're being loaded -- or failing that, dump them forcibly using a tool like NinjaRipper. It's not an exact science and prone to exporting them in invalid formats, but what are your alternatives...?
Viewing VRAM in computer games is another kettle of fish, and one I need to find a more specialised means of exploring. In the meantime, Windows 10's Task Manager has a convenient "create dump file" option by right-clicking an application, producing a file you can chuck into TiledGGD and explore!
Outside of more esoteric knowledge reserved for the other pages, I think this is as much as I can teach! But ripping graphics is only one part of the process: what do we do with all these bits?
assembling tiles and organisation
So you ripped your tiled graphics... what now? Well, you gotta put them together, surely! Finding the sprites is the first step, but putting them together is the journey...!
First of all, if it's a tile-rip or screenshot rip, it's good to keep the background colour intact. The game might regard them as transparent, but to hold onto them for now is a valuable guide to piecing them together or organising them!

Bang Bead (Neo Geo)
For actual decades I would just piece together tiles in MS Paint. It does the job, it just requires you get real acquainted with your eight-times tables, and very gently moving the mouse...
... but honestly, Paint.Net or other such tools are probably better. It has convenient keyboard shortcuts, you can move your selection using the arrow keys, and can even change the default size of the selection box to match the size of your tiles. The "Grid/Checkerboard Maker" plugin is handy for creating a background layer to serve as reference for adhering to the tile grid.
Whatever tool you use, do make backups of your progress, even of the tiles before you begin assembling -- it's possible to make mistakes and overlook them, even simple errors like accidentally pasting something and forgetting about it, ruining a chunk of sheet...! To have an older version to go back to instead of having to redo it from scratch can save you so much trouble.

Double Dragon (Xbox 360)
If you're working with a lot of tiles (that are hopefully neatly organised), you might want to consider TilEd. It's a program made for creating maps in RPG Maker and the like, but given the fact tiles and tilesets are its bread and butter, making it put together a sprite isn't too far out of its wheelhouse!
Its map and tileset files can also be edited in a text editor, allowing you to change tiles that way, or even swap out the source image it's making its tileset from. While the former is a bit pernickety, the latter is ideal for assembling sprites in bulk if they use the same layout -- just swap the source image in the tileset file for something else, reload the map file, and export afresh!


Tactics Ogre (SNES) / Turok Evolution (Game Boy Advance)
That program firmly adheres to its grid, however, and not all sprite assembly is as strict. Tiles might be offset by a couple of pixels (as seen in the Tactics Ogre example above), or designed to be overlaid on top of another chunk, like in Turok Evolution up there. That sprite is made up of 7 variably-sized chunks, and the coloured backdrops will show how much overlap there is...!
While the likes of Tactics Ogre are prime examples of using TilEd, to automate the assembly of many sprites organised the same way, stuff like the latter you're better off just piecing together manually. Sometimes grabbing all the tiles ahead of time is a great time saver, while in some cases you're better off assembling one sprite at a time; different games require different methods!
If worst comes to worst, don't be afraid to rely on a gameplay rip to see how things are meant to fit together. Sometimes the real reason to rip from the tiles is simply to confirm how many sprites there are, to be assured you're not missing anything.
Tribal Hunter (PC)
If it's a dump or screenshot rip: are the sprites evenly positioned across all images? You'll typically get this result with a sprite viewer or switching sprites through RAM. If so, using a tool to crop them in bulk can be a big help, be it Aseprite, ReaConverter, even StitchStudio.
If not, you might just have to manually edit all the images and paste them onto a new canvas. It's a bore, and I want to know if there's a quicker way of auto-cropping to variably positioned results...!
The Spriters' Resource-endorsed tool SpriteSheeter is recommended for working with graphics dumps; import some animation frames, set how the border width or background colour, give it a title header if it so needed, and export! It's a bit fiddly for my liking, but being able to manage large sheets like my Tribal Hunter and Blazing Beaks dumps is good.

Street Fighter Alpha (Game Boy)
Of all things, I use Microsoft FrontPage a bunch. It's an archaic tool meant for flippin' webpage creation, and the farthest thing from a professional image editor -- I continue to use it for odds and ends on this site, so I just find it handy! It's personally ideal for organising cropped rips; you can find animations and change the layout easily enough, then 'exporting' by screenshotting it through Firefox -- just be sure to disable filters on the images!
On rare occasions I use it for assembling tiled sprite too, though truthfully, only because I'm old and stubborn. It requires some prep in cutting the tiles into individual images with StitchStudio, meaning it might be dealing with a couple thousand images on one page, and unless you're using tables, you're gonna be using 'filler' images to pad the gaps between tiles. Take this more as a symptom of my poor decision-making than an actual recommendation.
There's a page for tools that might be helpful, but for now, I think that's the gist of it! Before I go, some quick 'n' nasty pointers for a good sprite sheet:
● Organisation: It might not be until you've ripped and assembled all the sprites that you can decide how best to organise the sheet. Don't be afraid to have a messy canvas; better to have free space to work with than try and cram it in tight from the get-go! That's harder to tidy up after the fact, and how I irreparably botched my Puchi Carat rips...!
Make it readable! It doesn't need to be separated by line-breaks or have instructions for every animation, so long as I've a vague idea of what's where. An ugly sprite sheet is still a sprite rip, so don't fret over it too much; my old method of ripping sprites was just seat-of-my-pants stuff, and it did get results, but not necessarily pretty ones. My Luminous Arc sheets are gruesome to look at.
● Background colour: You want it to be a distinct colour from anything on the sprites. A lot of sprites from yesteryear were botched because they used the default white as their background -- and surprise, a lot of sprites used that too! That's why you see a lot of hot pinks and garish greens as backgrounds on sheets.
Having a transparent background does look nice on a webpage, though be aware programs that can't handle transparency like MS Paint will have a hard time with these, and often present transparency as black. If it's a colour-indexed GIF, you can change the transparency to a different colour so it'll play nicely in such programs.
● Palettes and assembly: Sprites with multiple palettes or are made up of separate pieces, is it better to include those in full, or leave it as a DIY project for the user? My useless non-answer is: whatever seems reasonable! See the tangents and topics page for a diatribe on that.
An important thing to remember when ripping sprites is that not everyone is going to 'use' it -- as in, edit it for animation, games, comics, whatever. Some folks just like to look! To have something to give an idea of what the sprite is meant to look like is appreciated.
I won't deny a lot of my old rips, that are just nothing but pieces and no suggestion of what they look like assembled, are a bit disappointing. Sprite ripping is a niche-ass hobby as it is, you might as well let folks see the art in it...!
After all that... I think you're done! You can submit your sprite someplace, or keep it for personal use, or do whatever the heck you want with it.
It feels incorrect to call this "the basics", but it's as surface-level as I can get while still giving an outline of all the possibilities. If there's more details you want to know, be it the ins and outs of specific consoles and file systems, or just more bad opinions, there's other pages to browse.