
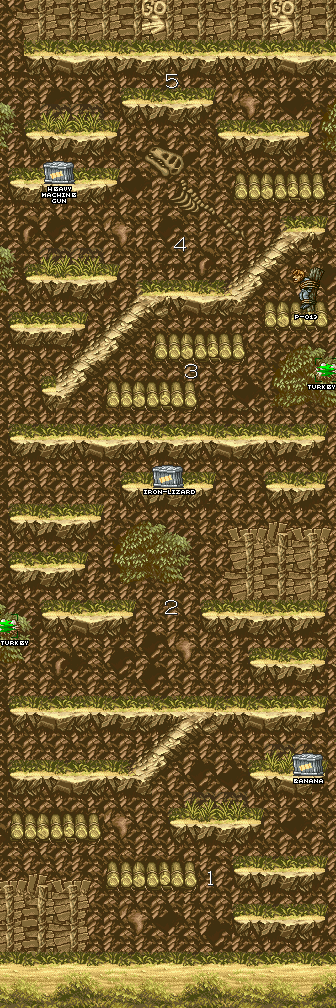
Mission 1
This walkthrough is written by Rage Quitter 87.
Like all first levels in video games, Mission 1 is pretty easy and you shouldn't have that much trouble getting through it. The first time you play this mission you will get to see a small cut-scene showing a few blue soldiers running out off a boat, followed by your character, as Allen Jr. tells you to advance. This level is set at the outskirts of a jungle/forest type place for the most of it apart from part 3.
Part 1 - Trenches

===CLICK FOR BIG===
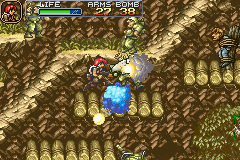
[1] As soon as you start this mission, a soldier will try and attack you but never seems to hit you if you stay still. Anyway, when you are starting this mission, don't move. Just shoot the first soldier I just mentioned, then aim up and fire. The bullets fired will make a noise as if they are hitting something. Keep firing until a prisoner drops down, who is prisoner (001) and he will give you Card 011 S.Clip.
[2] After doing this continue forward and you will see a trench with two soldiers in it and another prisoner. Kill the soldiers - they are usually too slow to shoot at you - then free prisoner (002), who will drop a Heavy Machine Gun, make sure to collect it. To the right of the trench is a ledge with prisoner (003) on it, free him to get some bread.
[3] Continue right shooting the small number of enemy soldiers that appear until the screen locks and won't let you scroll any further. Be sure to be at the left of the screen at this point as a tall enemy tank will appear from the right and start moving towards you. With the heavy machine gun this tank will not take long to kill and can usually be destroyed before it even fires a shot. If it does fire a shot avoid it by jumping, as this tank's shots always travel slowly across the floor. When you do destroy it, prisoner (004) will drop down from above you and when saved will give you some grenades.
[4] The screen now unlocks and lets you go to the right, and there is prisoner (005) in front of you. When he is saved he will give you some canned food.
[5] Keep going right and you will see another trench, with two soldiers and one prisoner in it. Throw a grenade to kill the enemy soldiers and then save prisoner (006), who drops a Rocket Launcher. Collect it, then jump back up to the ledge to the left. Then jump right and shoot upward to free prisoner (007) who was tied up in the air. He will drop to the floor and will give you some bread.
 [6] Now jump out of the trench and keep going right. You will see prisoner (008). Save him for more bread. At this point you will see two wooden platforms, and one enemy soldier in the middle of them. Go to the middle and kill the soldier, then crouch and keep shooting to the right. Prisoner (009) will appear to give you Card 066 Walter.
[7] After doing this, continue going right until you have to fall down into yet another trench. When you do fall down it, go to the left corner of it and shoot to reveal prisoner (010) who will give you Card 067 Tyra.
[8] Now go right a bit and a big enemy helicopter will appear and start dropping bombs in sets
of three. These bombs are easy to avoid and the helicopter can easily be
destroyed quickly with the Rocket Launcher. The screen will unlock so you can
progress right again. Before jumping out of the trench, shoot at the bottom
right hand corner of it (make sure to crouch) to reveal prisoner (012), who has
Card 057 Red Jewel.
[9] When you do jump out of the trench, stay on
the ledge and move to the left, then jump to the left and shoot upward. Prisoner
(011) will drop down, who was tied up in the air much like prisoner (007). Save
him to get a Heavy Machine Gun.
[10] Now keep going right. There are a few enemies here, so kill them carefully. Once
they are all dead or avoided, keep going right to finish this part of the
mission.
Part 2 - Cliffside
===CLICK FOR BIG===
[1] Go right and you will see three
enemy soldiers who have those little rocket launchers. Kill the first one by
going next to him and firing, then aim up and kill the other two. Jump up four
ledges and there will be a box on the fourth ledge. Shoot it to get a banana.
Whilst still on this ledge, aim up to take out another enemy with a rocket
launcher, then jump upward to land on a slope.
[2] Walk right up the slope and move to the right of the screen, then
jump up to the ledge above you. Jump up to the ledge above that, then jump
across to the left to another ledge. There are a few enemies here than need to
be taken out so make sure to do so. At the left of this ledge you can see a
bird's nest. Shoot it to reveal a turkey. Now from this ledge, jump up
two ledges. There is a third ledge to the right which has a box on it which you
have to jump across too. Do so and shoot the box to get the Iron Lizard.
Jump up from this ledge to the land above you to face a enemy tank.
[3] The tank can be destroyed by blasting it with the Iron Lizard, but
watch out for the enemy tank's shots. Once it has been destroyed, move to the
right and you will see another bird's nest. Shoot it and you will get another
turkey. You can now see two ledges above you, jump up to the second one and
kill the enemy rocket launcher soldier. From here you can see a tied up prisoner
to the right. However there are a few soldiers running around, so kill a few of
them. Once things are clear, jump over to prisoner (013), who will give
you a very useful Shotgun once saved.
[4] From here, jump up and you will be on another slope. There is a
wooden log ledge above you, jump up to it. Another ledge is above this one, so
jump up to it. Jump to the left to land on another ledge. If you want a Heavy
Machine Gun, go to the left of this ledge and fall off it and land on the second
ledge below it to see box which has the Heavy Machine Gun in it, but I
would stay with the Shotgun. Anyway, once you are on the middle platform, jump
up to be on solid land.
[5] From here an enemy tank will attack you, destroy it and then keep
going right to end this part of the mission.
Part 3 - Ruins

===CLICK FOR BIG===
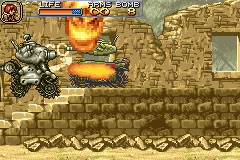
[1] As soon as you start this part, there is a Metal Slug waiting
for you (or it may be a different Slug, depending on what you have turned on,
see the cards section for more details) Jump into it and an enemy tank will
appear. Use the Slug's turret to destroy it and try and save your shells for the
boss.
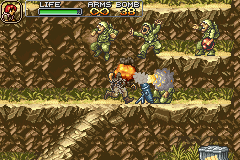
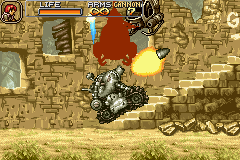
[2] Keep moving right and a few soldiers will appear, just run them over.
Soon you will go past a stair case and the screen will lock as an enemy tank
appears on the top floor. Destroy it, and another tank will appear on the ground
floor, so blow that one up as well.
[3] Once the second tank is no more, the screen will let you move right
again, and you'll see a box. Run it over for some gas which will top up
your Slug's health. Continue right and the screen will lock again, and lots of
enemy soldiers will drop down. Run them all over and soon a enemy tank will
appear from the right of the screen. When you destroy it, another one will
appear from the left of the screen. You know what to do. Once the second tank
has been blown up, the screen will unlock so you can move right again.
[4] At the first window you see, shoot at it and after a while
prisoner (014) will drop down and will give you some more shells/grenades.
Keep going right and you will see another staircase, and then the screen will
lock as two enemy helicopters appear. Shoot them down with your slug's heavy
machine gun. When destroyed, one helicopter will drop some bread and the
other one will drop canned food. If you have the Card 052 Tutor's Love,
you can enter the training camp, although be wary that you will lose your Slug
if you do so. Otherwise, go up the staircase to the boss.
Part 4a - Training Camp
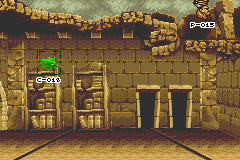
When inside, move to the right and shoot
upward to free prisoner (015) You really need the Shotgun to free him
this way. When you save him, he'll give you the Card 027 S.Grenade+. Now
go to the left to see two bookcases. Shoot the one nearer to the exit and a
Card 018 Handgun+ will drop out for you to collect. Now leave this area
and go up the staircase to end this part of the level.
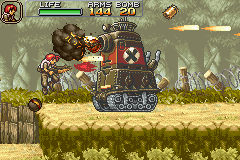
Part 4b - Boss
The boss of Mission 1 is a big tank called
the Formor, which is three times as big as a Metal Slug. Formor will shoot
shells in sets of three, with each one going a certain distance so watch them
carefully and move to avoid them. The Formor also has a charge attack where it
will ram into you, so to avoid this simple jump when it is about to hit. The
Formor's other weapon is a gun on the back of it that fires at you, so make sure
to duck to avoid being hit, or jump the shots.
If you still have your Slug, this boss fight
will take no time at all. Use all your shells on it and it should blow up pretty
quickly. If it still hasn't blown up and you don't have any shells left, press L
to crash your slug into the boss to damage it further.
If you don't have your Slug, use grenades to damage it. At this point you should
still have your Shotgun that prisoner 014 gave you, and this does great damage
to the Formor. If you take a while and still have not destroyed the boss, a
Heavy Machine Gun will appear, collect it if you only have your handgun.
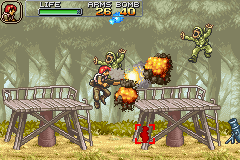
 By the way, when the boss doesn't have much health left, flames will be on it
everywhere. At this point the Formor will have a new attack where it does huge
jumps around the screen trying to crush you a few times. Just keep moving around
to avoid being squished.
By the way, when the boss doesn't have much health left, flames will be on it
everywhere. At this point the Formor will have a new attack where it does huge
jumps around the screen trying to crush you a few times. Just keep moving around
to avoid being squished.
To get the Formor's card, you must destroy it quickly. One way to do it is to
have Crawler+ (Card 041), and simply ram into the Formor while firing missiles and
using your turret. Alternately, have the Black Hound unlocked and use it in this
mission. When you get to the boss, hold down the fire button to fire the homing
rockets and keep pressing R to shoot shells into it. If you run out of shells,
press L to crash the slug into the boss. With the Black Hound, this boss will
soon fall and you will get it's card.
prototype
Click maps to enlarge them.

The second-to-last trench was shortened for the final, and the final platform extended. The prisoner with canned food is found before the Sarubia in the prototype, but after it in the final. The prisoner who falls after destroying it doesn't appear in the prototype.

The area's width was narrowed a little, some platforms were changed to logs in the final for variety's sake, and the holes were changed to foliage and a dinosaur skeleton. The final adds more hidden turkeys, and moves the banana and Heavy Machine Gun to lower platforms.
The big slope near the top had its bottom removed in the final, because if you miss getting the prisoner on the far-right in the prototype, you gotta restart the stage to try again!

(final)
Identically laid-out, although this area seems to have trouble with its stall points; the two Masknells have yet to load for me when they should, and seemingly only appear when exiting from Tutor's Love.

The Tutor's Love room has no enemies, and changes the position of a card. The background graphics are missing its darkest shading.

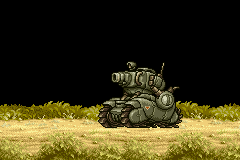
This boss is the most functional in the prototype, and can perform its cannon, jumping, and 'wheelie' attacks just fine. It will play its turret firing animation for a second, but appears incapable of firing shots from it. It has no collision detection when it isn't moving, allowing you to walk through it unharmed.
Notably, its graphics are different from the final's -- its cannon is longer and thinner, and its shells are much smaller with no fiery aura. This old design is still present on its card in the retail card.

As the only boss you can properly defeat, this is the only way to see the Mission Complete sequence. The character will play their unique pose instead of saluting (in the final they only pose after defeating the final boss), and the text will appear the same way it does on the Mission Failed/Game Over screen, rather than the rotating 'wave' motion. It will fade to black and return to Base Camp, but with a randomly placed graphical error.

